Browsing Tag:

cake

Baking

Egyptian Basbousa Cake Recipe

egyptian basbousa cake on plate

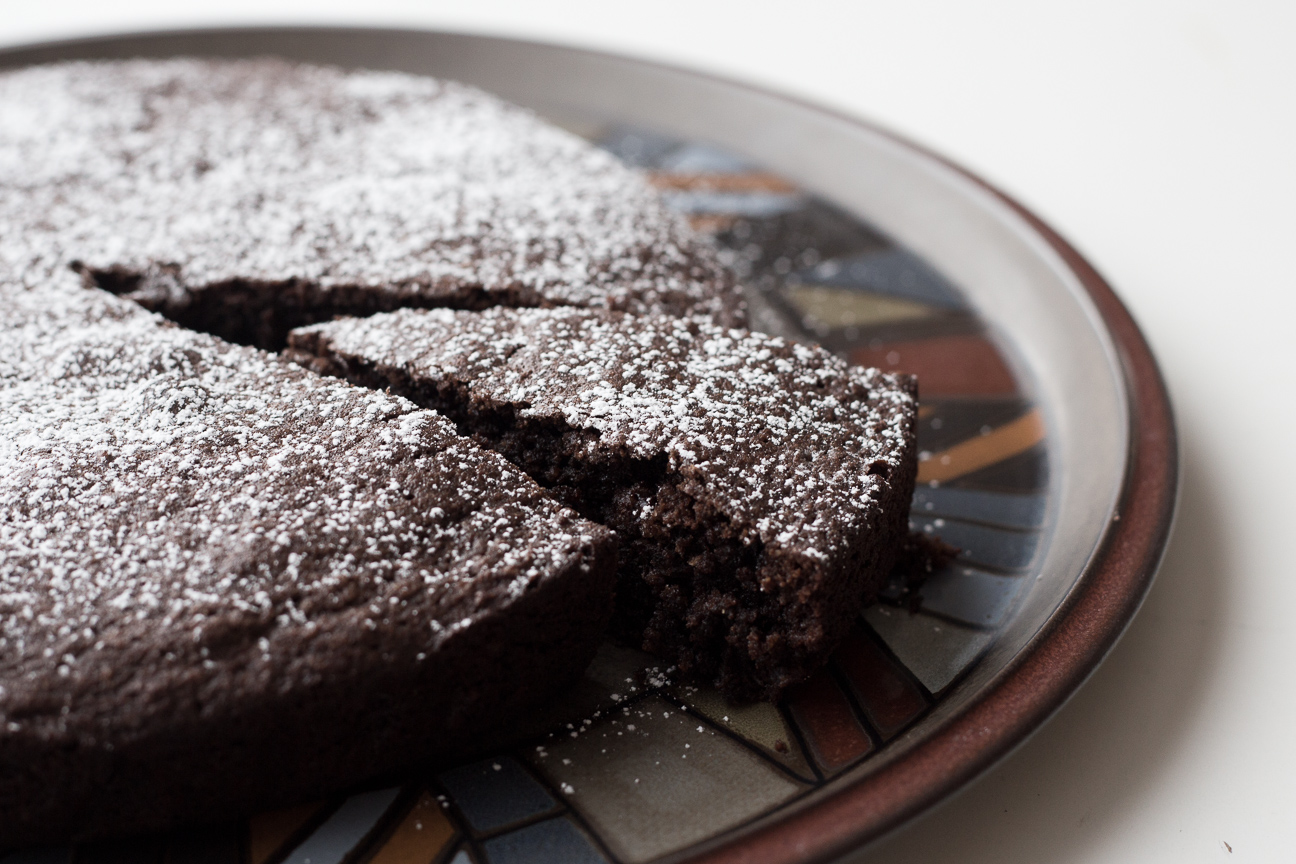
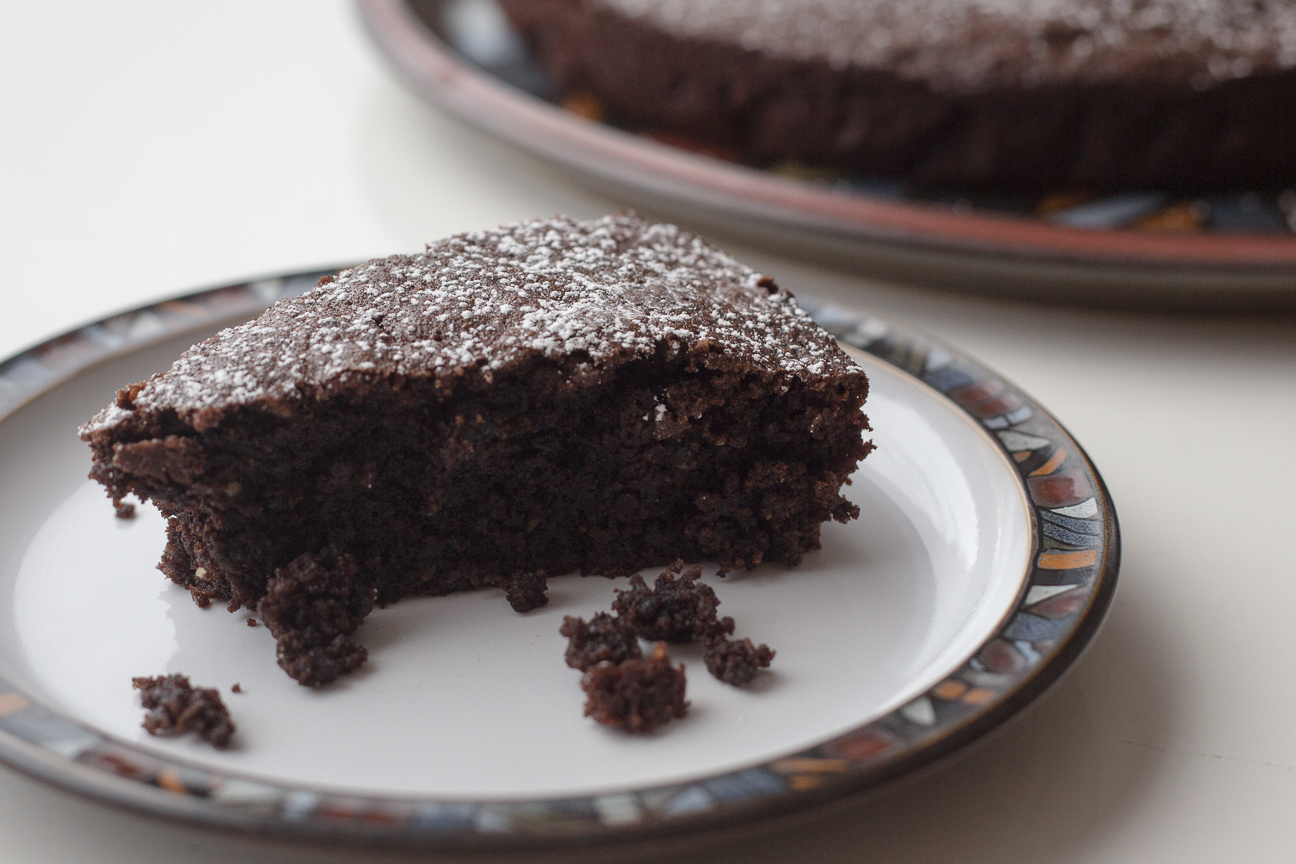
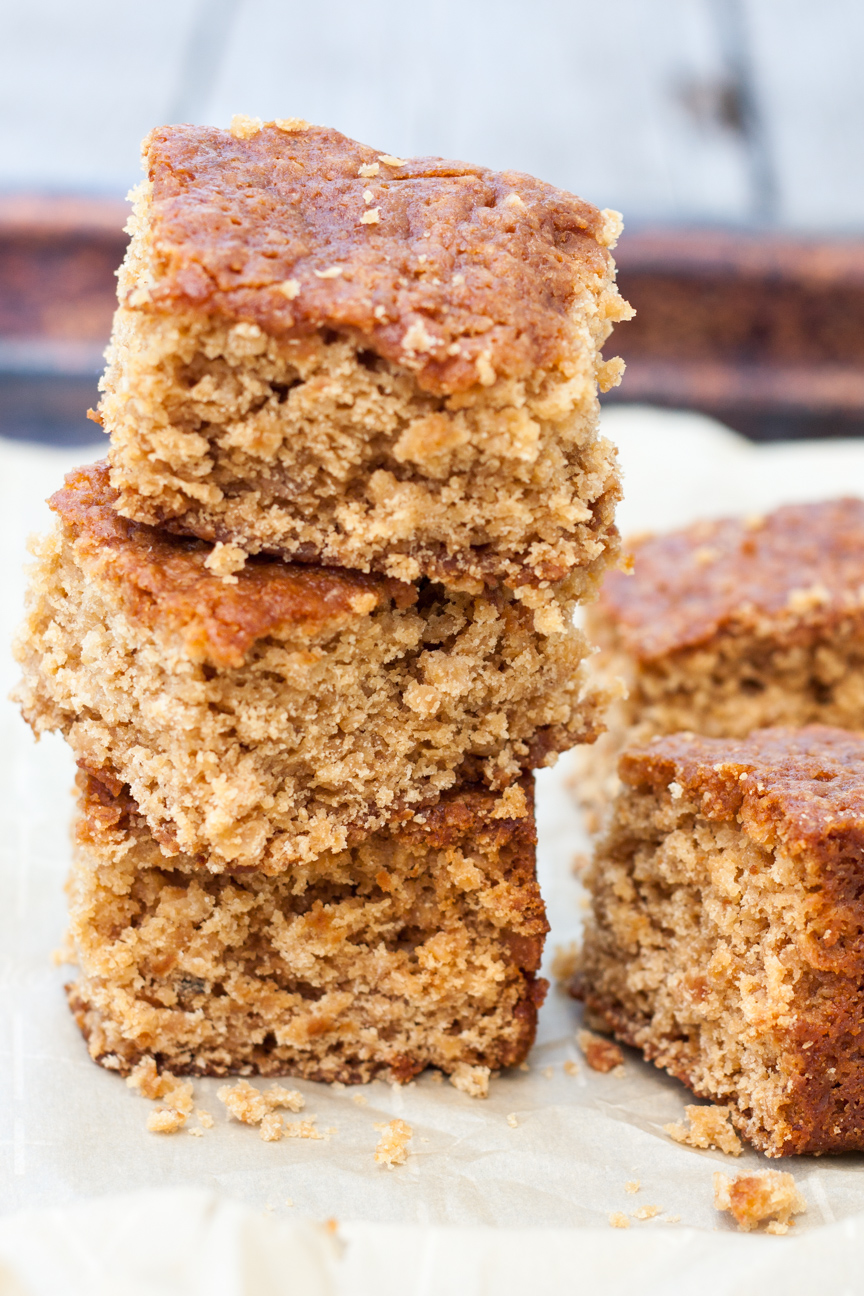
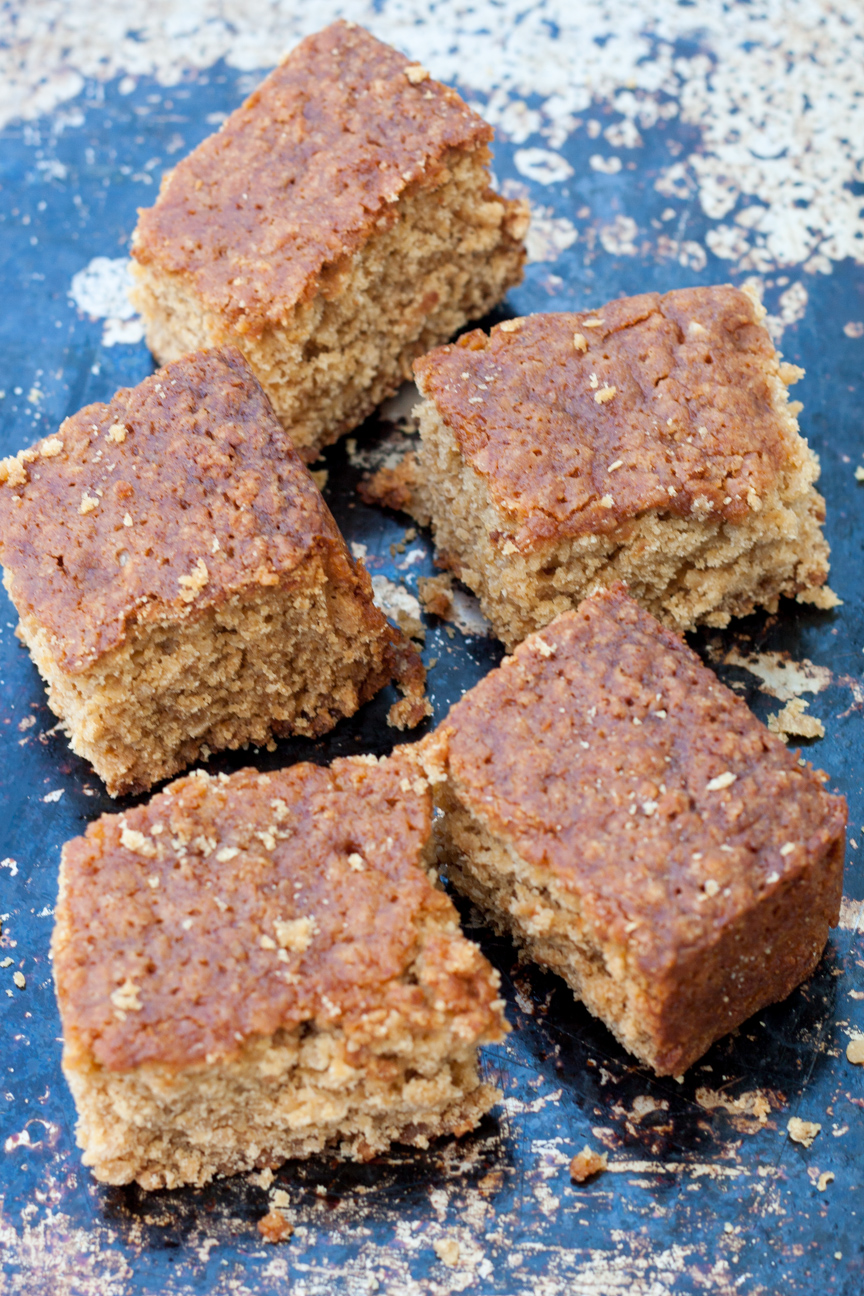
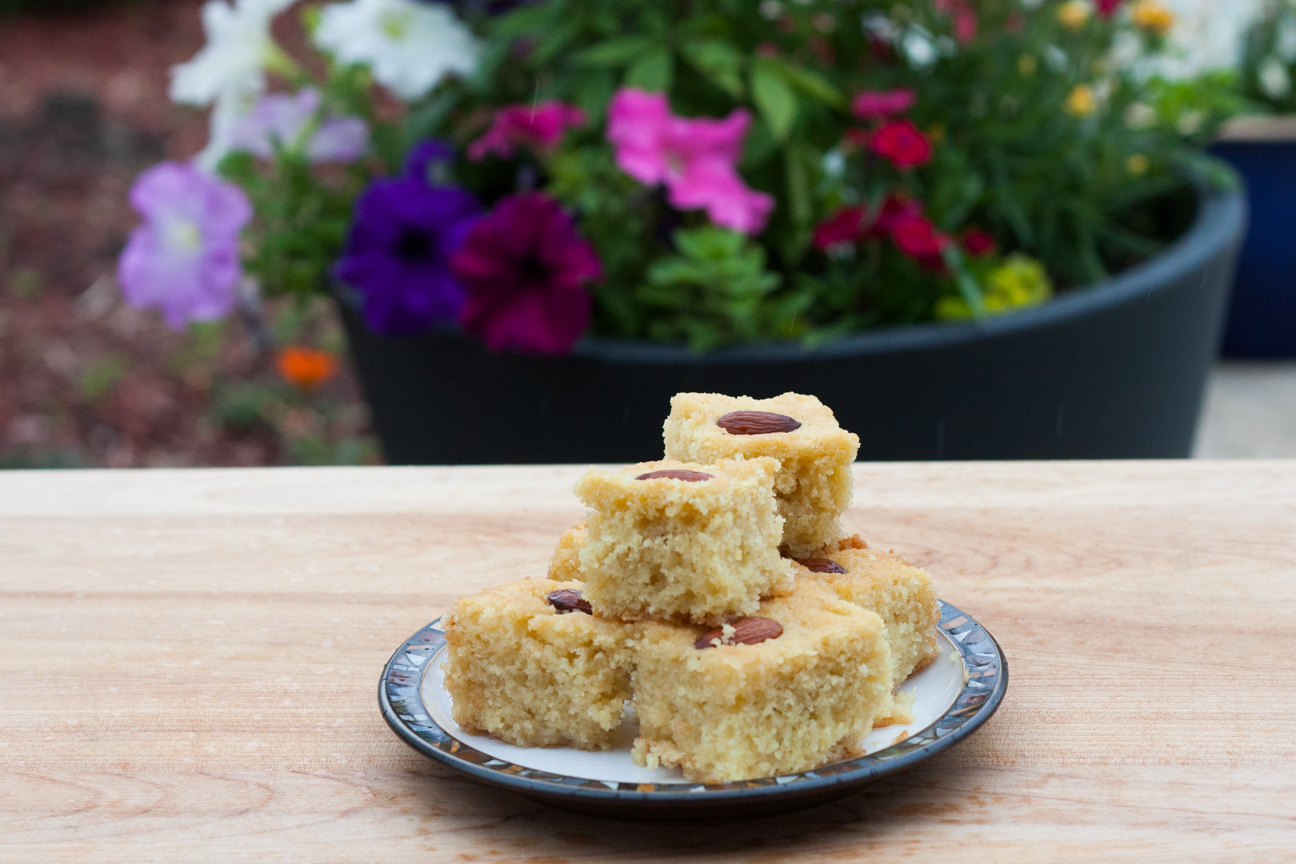
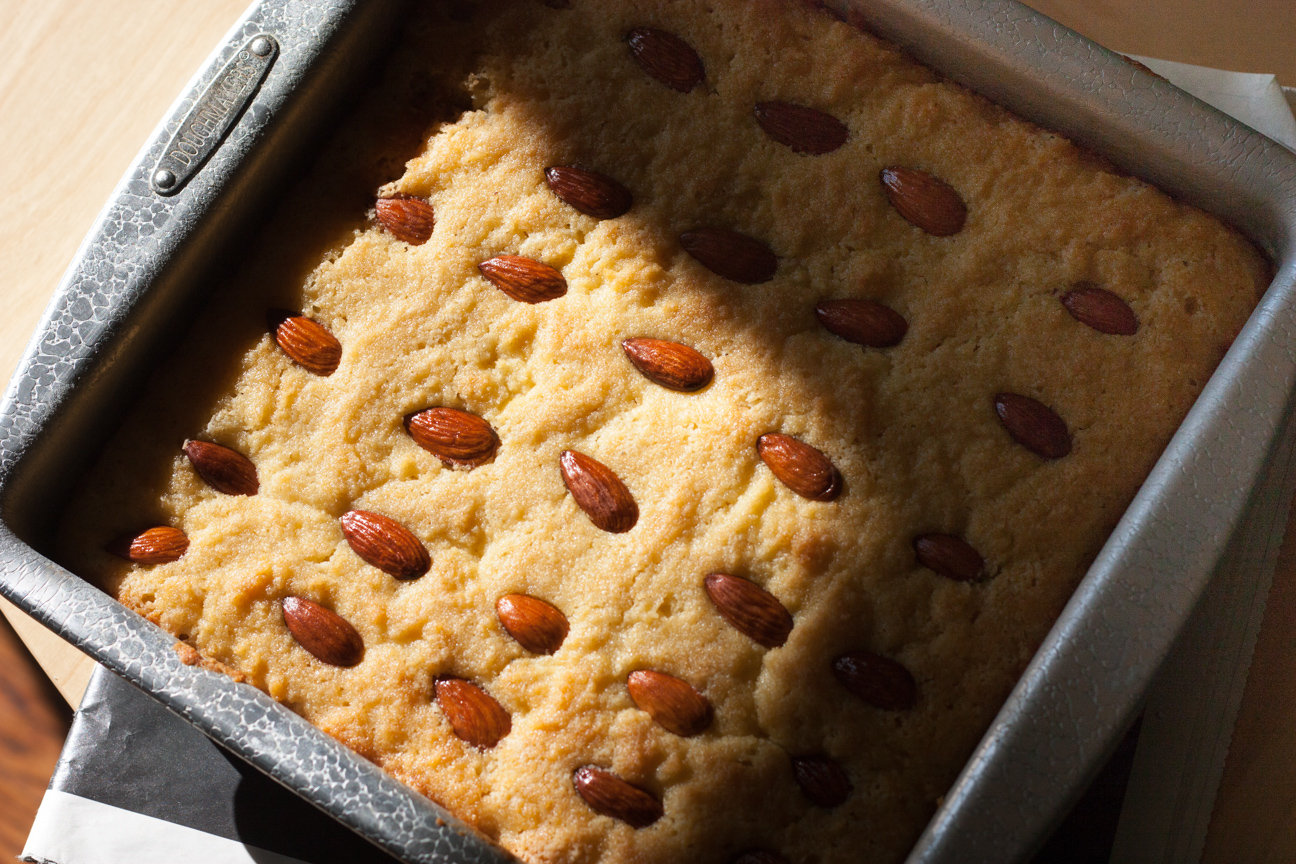
I love this Egyptian Basbousa Cake. From the texture of the semolina, to the sugar syrup and the nutty almonds on top. It is for sure, one of my favourite cakes to make and serve to my family.

I bake this cake when I’m feeling nostalgic about my travels in Egypt. Many years ago, my best friend Bonnie and I took off from Canada for a year long travel adventure. We had planned and saved for our trip for many years; we cut out travel stories from the newspaper and collected travel tips from friends. Bonnie and I were only 19 years old but we were ready for a big adventure.

It was a beautiful spring day when we landed in London, England.  We spent a few weeks in that lovely old city before continuing our travels through the United Kingdom, Europe and into northern Africa as well.

Europe is a fascinating place to travel at any age, but when you’re 19, it’s magical. We enjoyed all the art museums, comfortable, punctual trains, and the beautiful old buildings, but my favourite part was the food:  Austrian coffee, italian pizza and gelato in little cups, french croissants, greek baklava and egyptian falafels: all were breathtaking.

Over the course of twelve months, we sampled many delicious dishes and sweets. And my cooking at home is still influenced by that trip so many years ago. This year, while happily remembering our travels, I made one of our favourites sweets from our trip: Egyptian Basbousa Cake. We sampled many slices of Basbousa Cake while we travelled from Cairo to Luxor and to Hurghada on the Red Sea.

Basbousa Cake is a very popular dessert in the middle east. Many countries in this region make their own variation: Revani from Northern Greece, Ravani from Southern Greece and Hareesa from Jordan, the Maghreb and Alexandria. The names may be different, but the cakes are very similar.

egyptian basbousa cake with a bowl of semolina, a lemon and a jar of honey on a wooden table

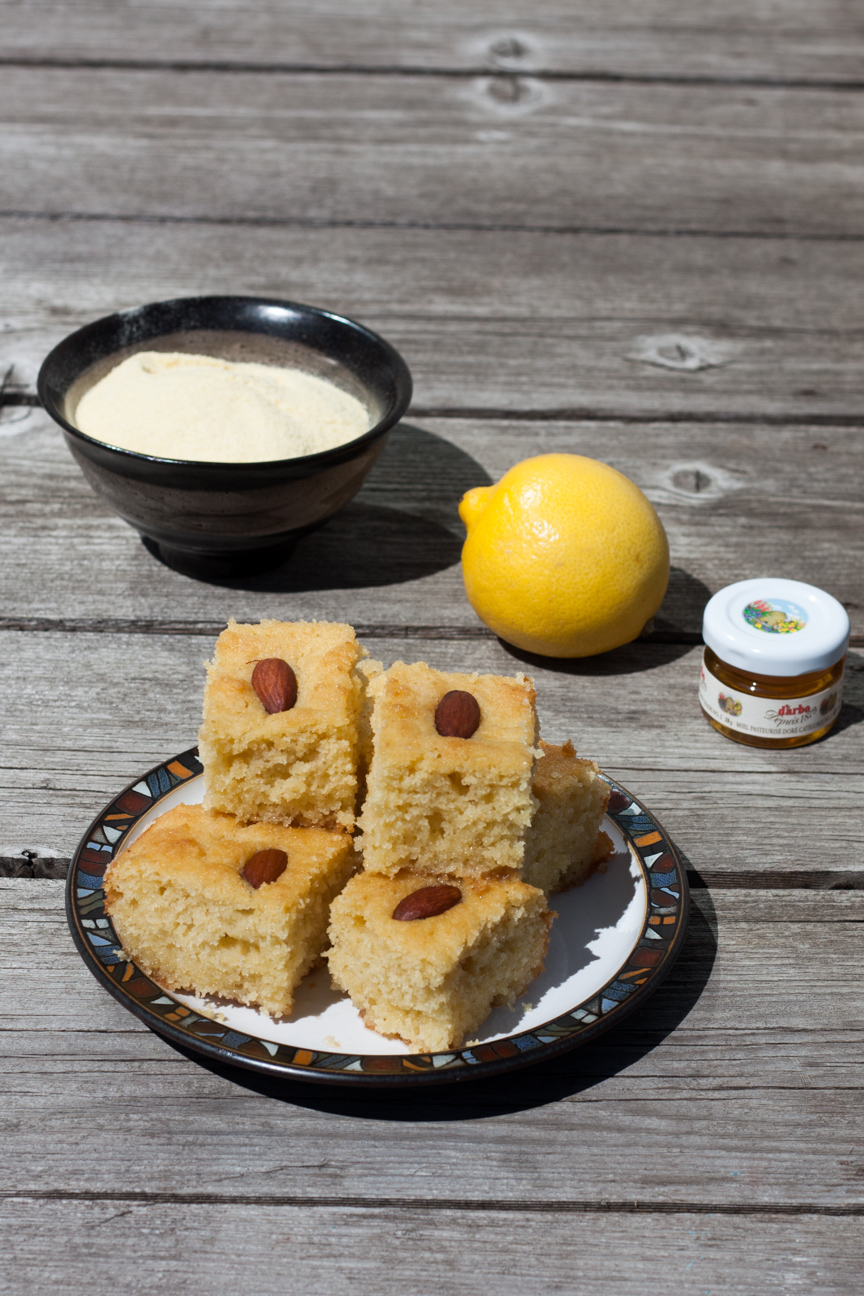
Egyptian Basbousa Cake is super easy to make as it only requires a few basic pantry ingredients.  Traditionally made with semolina, it has a surprising wheaty aroma and taste. I have also made it with cream of wheat cereal, and while it has a coarser texture, I still really like it.

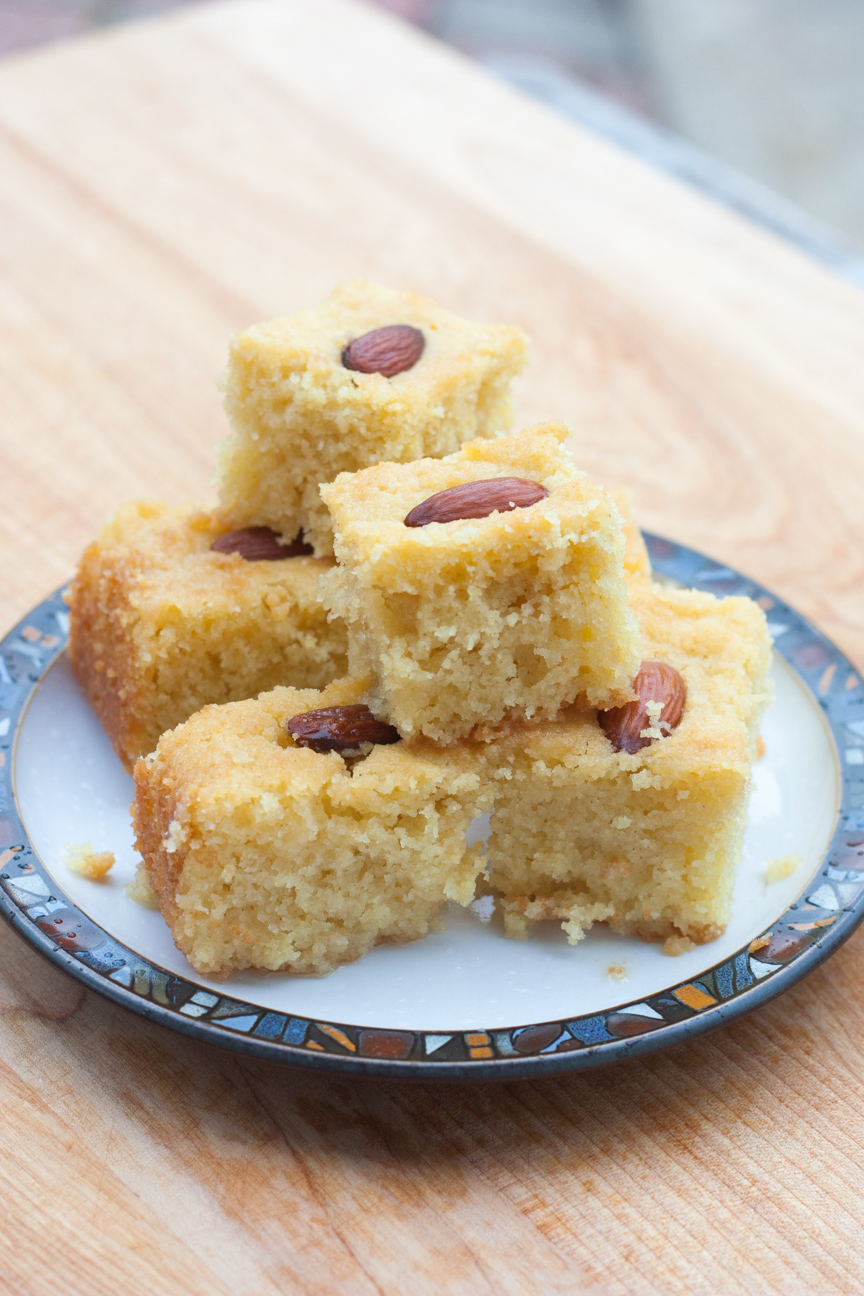
Basbousa is luxuriously sweet, with a cold lemon-scented sugar/honey syrup poured over the hot-from-the-oven cake. This technique also makes the cake super moist.  Because it is a very moist cake, it doesn’t slice as neatly as other cakes, but is so so delicious. A traditional finishing touch to the cake is to place whole almonds in the centre of each slice.

egyptian basbousa cake in a tin

This cake will keep for serveral days. It is excellent with tea or coffee. It would also be an excellent addition to an afternoon picnic on the beach. If you want to ramp this cake up a notch, served it with a dollop thick whipped cream.

Egyptian Basbousa Cake

Egyptian Basboussa Cake

Serves: 16
Cooking Time: 30 minutes

Ingredients

  • 1/2 cup butter, softened
  • 3/4 cup sugar
  • 2 eggs
  • 2 cups semolina (you can also use cream of wheat cereal)
  • 1 tsp baking powder
  • 1/2 tsp baking soda
  • 3/4 cup of yogurt
  • syrup
  • 1 3/4 cups sugar
  • 1 1/2 cups water
  • 1/4 cup honey
  • 1 tablespoon lemon juice

Instructions

1

Preheat the oven to 350 degrees.

2

Grease a 9 x 9 baking pan.

3

Whip the butter and sugar until well blended and a pale yellow colour.

4

Add the eggs one at a time.

5

In a separate bowl, mix the semolina and baking powder and soda.

6

Add dry mixture and yogurt to butter/sugar mix, alternating between the dry mix and the yogurt.

7

Pour into greased pan.

8

Bake in oven for 30 minutes, or until cake tester comes out clean and the cake is slightly golden on top.

9

While the cake is baking, you can make the syrup. Combine all of the ingredients in a small pot. Bring to a boil, stirring lots to help dissolve the sugar. Simmer for about 10 minutes. Then pour the syrup into a heat resistant bowl or very large measuring cup. Place the bowl in cold water to cool down the syrup. You could also place the container with the syrup in the freezer until the cake comes out of the oven.

10

Once the cake has come out of the oven, pour the syrup over the hot cake, until it is all soaked up. You may not need all of it, but you will be surprised how much it soaks up. Let the cake cool in the pan until cold.

recipe is slightly adapted from Tess Mallos The Complete Middle East Cookbook

Baking

Sublime Flourless Chocolate Orange Almond Cake

Chocolate Orange Almond Cake

Happy Mother’s Day! This Chocolate Orange Almond Cake is so perfect for Mother’s Day because nothing rounds out a Mother’s Day meal better than cake, but who wants to spend the day baking…not me!!

This cake is perfect for Mother’s Day because it is super easy to make. Because it only has 9 ingredients, it whips together in a jiffy and it only takes 30 minutes to bake. With a simple sprinkle of icing sugar on top, it’s ready to serve. This cake is perfect to make for your Mom, your mother-in-law or for yourself and your family. You could also get your children to help you in the kitchen.

This cake is special because it is made without flour. I love flourless chocolate cake. They are dense and dark and chocolatey. And this cake has the added aroma of orange reminiscent of chocolate oranges at Christmas. The texture from the ground almonds is very appealing as their nuttiness pairs well with the fudgy chocolate. If you’re looking for something to serve this year for Mother’s Day, this cake checks all the boxes: pretty, chocolate, not too sweet and quick to make.

You could serve this cake plain or bring it up a notch and have a dollop of sweetened whip cream on top. Yum!

To make this Chocolate Orange Almond Cake,  you melt the butter and chocolate together (I love this technique – don’t you? No whipping, or trying to get the butter just the right temperature). I grated the orange zest right into the bowl of melted chocolate. The orange-chocolate aroma is so enticing, I had to use all my will-power not to eat cake batter right out of the bowl. Please try to refrain. Your dinner guests will thank you (even when it’s only your family, as is the case everywhere right now).

Some flourless cakes, such as Torta Capresa, don’t add extra leavening, but I have added a small amount of baking powder to this cake. It adds just a bit of lift that I like. And gives the cake a lovely presentation. Enjoy!

slice of Chocolate Orange Almond Cake

Flourless Sublime Orange Chocolate Almond Cake

Serves: 8-10
Cooking Time: 30

Ingredients

  • 200 grams dark chocolate
  • 140 grams butter
  • 150 grams sugar
  • Grated zest from one orange
  • 3 eggs, separated
  • 2 cups ground almonds
  • 1/2 tsp baking powder
  • 2 Tbsp orange liqueur (such as Cointreau)
  • 2 Tbsp cocoa powder
  • icing sugar to decorate

Instructions

1

Preheat oven to 350 degrees F.

2

Grease 8” springform pan.

3

Cover bottom of pan with a circle of parchment paper.

4

Melt the chocolate and butter together in a microwave or a medium pot on the stove.

5

Separate the eggs.

6

Whip the egg whites until stiff peaks form.

7

Beat egg yokes.

8

Add grated zest to melted chocolate and butter.

9

Add sugar, almond meal, and cocoa powder.

10

Once the mixture has cooled to a tepid temperature beforehand, add egg yolks, and orange liqueur.

11

Mix everything together, gently.

12

Fold in egg whites, in two separate batches.

13

Pour cake batter into prepared pan.

14

Bake about 30-35 minutes. Cake will have risen nicely. And the scent of chocolate and oranges will fill the kitchen. A cake tester inserted in the middle should still have a few crumbs on it.

15

Try not to over bake, as the cake will be drier if overbaked.

16

Cool on a rack until quite cool.

17

Remove from cake pan.

18

Let cake cool some more, until cold.

19

Sprinkle with icing sugar just before serving.

Baking

Salted Caramel Blackberry Cake – So Darn Good

salted caramel blackberry cake with yogurt

I love blackberries. they have just the right sweetness and are a delicious combination of raspberry and blueberry flavours – two of my favourite berries. But, they have always been hard to buy as well as super expensive here in Ottawa. So, I was super excited to to find them frozen in my local grocery store. So exciting! Fresh blackberries also don’t last very long, so having access to frozen berries is fantastic. Plus, they work a charm in this delicious Salted Caramel Blackberry Cake.

This cake is a delicious rich cake overflowing with jammy blackberries and rich caramel notes from the brown sugar and salted caramel chips. As it’s also made with ricotta cheese, it’s an excellent snack cake to be served with either your favourite hot beverage or layered in a glass with yogurt and more blackberries.

The other reason to love blackberries, is because they are also super healthy. They are high in antioxidants, fiber, and vitamin C.

salted caramel blackberry cake

This Salted Caramel Blackberry Cake bakes up really well and quickly, and smells divine in the oven.

salted caramel blackberry cake with yogurt

Cake, yogurt, berries…triple yum!!!

salted caramel blackberry cake

Add extra berries on top if you like. It makes for a beautiful presentation.

salted caramel blackberry cake

This cake is so rich with ricotta cheese and jammy blackberries, it would be good enough for breakfast with yogurt and more berries! Or pack it up for lunch. And while you’re putting together your lunch kit, why not add an extra slice for a friend and make someone’s day extra special!

salted caramel blackberry cake

This cake slices up very well, has a good crumb, lots of berry flavour and a few nice hits of salted caramel sweetness! The blackberries and salted caramel chips provide enough sweetness that this cake doesn’t need any icing. Which is a plus for me!

salted caramel blackberry cake with yogurt

So so so good! Try cutting up some cubes of cake and pile on some delicious yogurt and extra berries. Yum!

Salted Caramel Blackberry Cake

Serves: 10-12
Cooking Time: 50-60 minutes

Ingredients

  • 1 1/2 cups flour
  • 1 cup brown sugar
  • 2 tsp baking powder
  • 3 large eggs
  • 1 1/2 cups ricotta cheese
  • 1/2 tsp vanilla
  • 1/2 cup butter, melted
  • 1/2 cup salted caramel chips
  • 1 1/4 cup blackberries (frozen or fresh)

Instructions

1

Preheat oven to 350 degrees F.

2

Line the bottom of a 9" round cake tin with a circle of parchment paper.

3

Lightly grease the sides of the cake pan.

4

Whisk flour, brown sugar and baking powder together.

5

Mix together the eggs, ricotta cheese, vanilla and melted butter.

6

Add dry ingredients to the liquid ingredients.

7

Lightly stir in about 3/4 cup of blackberries.

8

Pour the batter into the cake pan.

9

Sprinkle the remaining blackberries on top of the cake.

10

Bake in the preheated oven for 50-60 minutes.

11

When done, the cake should be lightly golden on top.

12

Remove from the oven and let it cool on a rack in the cake pan for about 10 minutes.

13

After 10 minutes, remove from the pan and let it cool down completely on a wire rack.

14

Enjoy!

slightly adapted from epicurious.com

Baking

Lancashire Maple-Oat Parkin Cake for a Summer Evening

lancashire maple-oat parkin cake

With the days getting cooler, especially the evenings, I start thinking more about baking. This Lancashire Maple-Oat Parkin Cake is a fantastic late summer bake with it’s ginger, treacle and maple syrup flavours.

A few weeks ago, my cousin Anne in Scotland, sent me a lovely little vintage Trex Cookery cookbook. She knows that I love cooking and baking and spotted this booklet in a vintage shop. The first recipe that I spotted was the Lancashire Parkin and knew straight away that would be the first recipe to try. Lancashire Parkin checked all the boxes for me for a lovely bake: oats, syrup, ginger and Demerara sugar.  She also sent me a beautiful cake tin decorated with a lovely photo of the Duke and Duchess of Sussex to store my cake in.

Lancashire Parkin is the Northern England version of gingerbread. It is a sticky, moist lightly spiced cake. It originated in Yorkshire, but is also popular in Lancashire, which is just to the west. No one seems to know where the name Parkin comes from.

Parkin cake is traditionally eaten in England on Bonfire Night, November 5th. Bonfire Night celebrates the epic failure of Guy Fawkes, a Yorkshire man, who tried to blow up the Houses of Parliament in 1605.

lancashire maple-oat parkin cake

Parkin Cake is a moist chewy cake due to the addition of oats. This cake also always contains sweeteners such as molasses,  black treacle or golden syrup, and light or dark brown sugar. I added maple syrup to my Lancashire Maple-Oat Parkin Cake, to reflect my Canadian roots.

Parkin Cake improves in flavour about 3 days after it’s been baked. This is to allow the oats to soften and the spices and sweeteners to really do their job. So, let this cake sit in a sealed container for 3 days before it is ready to eat. So, don’t be tempted to cut a slice immediately after baking. Wrap it up after it has cooled, and then patiently wait for 3 days to slice it up.  You will be glad you did.

Enjoy!

Lancashire Maple-Oat Parkin Cake for a Summer Evening

Serves: 12-16
Cooking Time: 40-60 minutes

Ingredients

  • 2 eggs
  • 1/2 cup milk
  • 225 grams flour
  • 225 brown sugar
  • 2 tsp baking powder
  • 22 grams medium oats
  • 1 tablespoon powdered ginger
  • 225 grams melted butter
  • 225 grams golden syrup
  • 1/2 cup maple syrup

Instructions

1

Preheat oven to 325 degrees fahrenheit. Prepare a 9 X 12 inch baking tray with parchment paper.

2

Melt the liquid ingredients together (butter, golden syrup and maple syrup). Let cool to room temperature, about ten minutes.

3

Mix the milk and eggs together and whisk until the eggs are incorporated into the milk.

4

Mix the dry ingredients together.

5

Add melted mixture and egg mixture to dry ingredients. Stir until all the ingredients are mixed together well.

6

Pour into baking dish.

7

Bake for about 60-90 minutes. It should be a nice golden colour on top when done. And a cake tester should come out clean.

8

Keep in the pan for about 1-2 hours, until cool. Then turn out onto a cake rack until cold.

9

Once cold, wrap in plastic wrap or place in a plastic container and store for about 3 days.

10

Slice and enjoy!

Baking

Japanese Matcha White Chocolate Cake for a Summer Picnic

matcha and white chocolate cake with green tea

Awhile ago I bought some matcha powder from The World of Teas here in Ottawa. There were so many things that I wanted to make with it, smoothies, ice cream, lattes and this cake. My son bought me this amazing cookbook for Christmas two years ago: Tokyo Cult Recipes by Maori Murota and inside was an easy recipe for Matcha Cake.

ingredients for matcha and white chocolate cake

Matcha powder, for those of you who don’t know,  is made from finely ground green tea. There are many varieties of matcha powder to buy, depending on whether you want to cook with it, or drink it. I used Culinary Matcha Powder, which is excellent for baking cakes and cookies, as well as using in smoothies and Matcha Lattes. It’s also a bit cheaper than some of the other matcha powders available purely for drinking.

Have you ever baked with matcha powder before? Well, this was my first time and all I can say is, Wow! Matcha powder is so fun to bake with! It’s like a little pinch of magic. In it’s packaging, it is dry, dusty and green….

matcha and white chocolate cake

…but once you add butter, sugar, flour etc. the flavour and aroma of the green tea really pops! And when the cake is baking in the oven, the aroma is just delicious.

I also love the effervescent shade of green. If you love green tea, then you will really enjoy this bake-up. This Japanese Matcha White Chocolate Cake is the perfect summery bake. The soothing sweet white chocolate is the perfect match for earthy and grassy notes of green tea. It’s just what you need for a summertime bake.

matcha and chocolate cake with green tea
Besides the great aroma and taste of this cake, I also just love that I can bake a green cake and you will too,

Japanese Matcha White Chocolate Cake for a Summer Picnic

Serves: 12
Cooking Time: 40-60 minutes

Ingredients

  • 3 eggs
  • 150 grams butter, softened
  • 150 grams sugar
  • 100 grams all-purpose flour
  • 50 grams spelt flour
  • 1 tablespoon matcha powder
  • 1 tsp baking powder
  • 70 grams white chocolate chips

Instructions

1

Preheat oven to 325 degrees fahrenheit.

2

Line a loaf pan with parchment paper. Or alternately, coat loaf pan with some softened butter, and then sprinkle flour on top. Shake out excess.

3

Beat the butter and sugar for about 5 minutes until very very pale and very fluffy.

4

Add in the eggs, one at a time. Beat the mixture in between each egg addition.

5

Sift the flour, baking powder and matcha powder.

6

Mix the dry ingredients into the butter sugar mixture either on very low on your mixer or with a wooden spoon or spatula.

7

Stir in the white chocolate chips.

8

Pour the batter into the prepared loaf pan.

9

Bake in the oven for 40-60 minutes.

10

Remove from oven when cake tester comes out clean.

11

Let cool in tin for about 10 minutes. Then remove and let cool on a rack.

12

Slice into approximately 12 slices.


Baking

My Mum’s Sensational Tomato Soup Cake

tomato soup cake with coffee mug

A favourite snacking cake in our family when I was growing up was Tomato Soup Cake. My Mum would make it for lunches or for an after-school snack.  After my parents were married, my Mum asked for the recipe from her mother-in-law, just so she could bake it for my Dad. Tomato Soup Cake has been around a long time and was a family favourite back when my Dad was growing up on the farm, in the 1920’s and 1930’s.

We always loved this cake and never once questioned the name of it. It didn’t taste or smell like tomatoes but was a beautiful rose colour with a spicy aroma. Once, while having lunch at school (which I seldom did), my friends asked what kind of cake I was eating. “Tomato Soup Cake”, I answered. Ooooh! was their negative response. I was in grade 7 and had never imagined that as a response to this delicious cake. But that never deterred me from loving this cake. My friends didn’t know what they were missing. My Mum’s cake was rose-hued, warm with spices of cinnamon, nutmeg and cloves and dotted with sweet plump raisins. With four always-hungry children in the family and a husband who grew up snacking on this cake on the family farm, my Mum’s baking never lasted long.

This cake is perfect for a ‘Retro Party” but also modern in flavour, colour and scent. It checks all the boxes for something easy, quick and yummy to bake up either for afternoon tea with friends, to pop into someone’s lunch kit, or an after dinner dessert. You can serve it with cream cheese icing, but my Mum just served it up plain, or sprinkled with icing sugar. It’s so moist, sweet and heavenly-scented with spices that you really don’t need extra icing. But you could add it if you prefer the extra creamy sweetness.

When I got married, a friend of my Mum’s gave me a cake pan, a wooden spoon and her recipe for Tomato Soup Cake. I thought that was the sweetest gift! Now I bake this cake for my own kids. Everyone in our family loves it.

slice of tomato soup cake

Enjoy!

Tomato Soup Cake

Serves: 16
Cooking Time: 55 minutes

Ingredients

  • 3 cups all-purpose flour
  • 1 Tbsp baking powder
  • 1 tsp cinnamon
  • 1 tsp grated nutmeg
  • 1 tsp ground cloves
  • 3/4 cup shortening
  • 1 1/4 cup sugar
  • 2 eggs
  • 1 10-ounce can condensed tomato soup
  • 3/4 cup water
  • 1 tsp baking soda
  • 3/4 cup raisins

Instructions

1

Preheat oven to 350 degrees F.

2

Mix together the flour, baking powder and spices.

3

Cream the butter, sugar and eggs until fluffy.

4

Mix soup, water and baking soda.

5

Let this mixture sit for a few minutes, then stir into butter/egg/sugar mixture.

6

Stir in dry ingredients and raisins.

7

Spoon batter into a greased 13 X 9 inch pan.

8

Bake 55 minutes or until golden brown.

More reading about this scrumptious cake

The History behind Campbell’s Tomato Soup Cake

A Good Little Read from The Kitchn about Tomato Soup Cake

Baking

Chocolate Ginger Hazelnut Torte Recipe

chocolate ginger hazelnut torte on a plate

If you have never had a torte before, you must try this one. Made from eggs, ground nuts, sugar, chocolate chips and ginger marmalade, this Chocolate Ginger Hazelnut Torte is a treat! And so simple to make. It rises up beautifully as it bakes and then after you take it out of the oven, it slowly starts to deflate until the centre is quite sunken in. The texture is more like a brownie, than a regular chocolate cake: the torte sort of falls on top of itself and all the layers and flavours pack themselves together beautifully. This torte is delicious served with sweetened whipped cream or ice cream, if you must.

Torte, in german, means cake. But the difference is that tortes use ground nuts instead of flour. I love the combination of flavours in this Chocolate Ginger Hazelnut Torte. If you don’t have any hazelnuts in your pantry, ground almonds would work fine.

I don’t feel that it’s necessary to have dessert every evening as it wouldn’t seem special. And I think desserts should be special. I love the idea of having something to look forward to on the weekend. And a weekend sweet treat is sometimes all I need to brighten up my week. I made this  Chocolate Ginger Hazelnut Torte recently for a weekend dinner just for our family. A little chocolate boost, a mid-winter perk when the days are starting to shorten, but still seem so long and dark. This torte is the perfect end to a cozy comforting meal: whether you wish to try something new or perhaps serve a gluten-free dessert to your dinner guests, this torte will end the evening on a high note.

Let me know how this recipe turns out for you. We all think it’s one of the best flavour combinations around.

whole chocolate, ginger and hazelnut torte with wine bottle

Chocolate Ginger and Hazelnut Torte

Serves: 10-12
Cooking Time: 1 hour

Ingredients

  • 175 grams dark chocolate
  • 175 grams butter
  • 5 eggs, separated
  • 175 grams granulated sugar
  • 150 grams hazelnuts, ground
  • 200 grams ginger marmalade

Instructions

1

Preheat oven to 190 degrees Celsius.

2

Line a 9 inch round springform pan with parchment paper.

3

Melt chocolate and butter together in microwave, in 30 second intervals, stirring inbetween. Add ground hazelnuts and marmalade. Stir and allow to cool.

4

Beat egg yolks and sugar together with mixer until soft yellow and mousse-like consistency.

5

Whip egg whites until stiff peaks are formed.

6

Add egg yolk and sugar mixture to the chocolate/butter/nut and marmalade mixture. Stir until well incorporated.

7

Now add the egg whites, in 3 stages, very carefully. Fold the egg whites in carefully in order not to knock the air out of the batter.

8

Pour the batter into the prepared cake pan.

9

Bake at 190 degrees Celsius for 20 minutes. Then turn the oven down to 170 degrees celsius and continue baking for another 35-40 minutes. The cake is done when a cake tester, inserted into the middle of the cake, comes out clean.

10

When done, remove the cake from the oven and place on a rack. Let cool for about 10 minutes, then remove sides of cake pan and continue to cool. The cake will sink. this is normal.

11

enjoy!

Recipe adapted from Rachel Allen’s cookbook, ‘Bake!‘.

Baking

Mum’s Traditional English Trifle

close-up-of-traditional-english-trifle

My Mum always made a Traditional English Trifle for New Year’s Day. Every year. I can still recall the big bowl of glistening trifle in my mum’s fridge. The colours of the trifle were illuminating. Sparkling. It was like a prized possession taking up most of the room on the top shelf of the fridge. I’m not even sure my Mum allowed anything else to be beside it in the fridge. It. Was. That. Special. Candied cherries glistened on top of delicious sweet whipped cream. Below the cream were cubes of sherry-spiked pound cake suspended in colourful jello. Rainbow coloured fruit cocktail and golden custard swirled in the centre. I couldn’t wait for New Year’s Day dessert.

As I was making it this year, I was thinking how it seems like an odd winter dessert: cold jello, cold custard and cream and cold fruit cocktail. It seems like it should be more of a traditional summer dessert, like for the Queen’s birthday, or perhaps Canada Day. But I realized that what is special about having this very colourful cold dessert in the middle of winter, is that it’s a little reminder that summer will soon be here. It’s reassuring that these arctic temperatures won’t last forever and before we know it all the birds will be back, the bulbs will pop up and all the colours of spring and summer will surround us once again. People often complain about our long cold winters. I don’t mind the cold so much, but what I really miss are the colours of summer.

The first time I made this trifle was many many years ago, for my friend’s daughter’s 5th birthday. She must have heard her mother talk about my Mum’s trifle and wanted that for her birthday cake. So my friend asked if I could make a Traditional English Trifle for the big party. My Mum helped me of course. I had a lot of fun making the trifle and decorating it. I went out and bought the pound cake, jello, whipping cream and candied cherries , as that’s what my Mum used to decorate the top. I used my Mum’s special glass trifle bowl and worked hard to make it as pretty as could be. As it was close to Christmas I chose a lovely lime jello for the bottom and decorated the top with red candied cherries cut in half. It had a lovely red and green theme.

Well, I suppose I underestimated how some children react to green food, because as this lovely trifle was brought to the table of 10 girls, one of them shouted out, ‘Oooh, it’s green! I’m not eating that.” Well, that was a surprise!! In the end, after we explained it was just green jello with cake and whipped cream, a few of the girls tried some. Luckily there were plenty of adults there and we polished it off very quickly. It was very, very delicious.

It doesn’t need to be New Year’s Day to make a trifle. Though trifle truly makes a lovely winter dessert. Try some and you’ll see why.

traditional-english-trifle

Mum's Traditional English Trifle

Serves: 8-10
Cooking Time: 30 minutes

Ingredients

  • 1 pound cake
  • sherry or your favourite liquer
  • 1 box of jello
  • 3 tablespoons of custard powder
  • sugar
  • milk
  • 500 ml whipping cream
  • fresh fruit, sprinkles or your choice for decorating the top

Instructions

1

Cut the pound cake into one inch cubes. You can sprinkle some sherry or liquer on the pound cake, however, it is not essential. The trifle tastes fine without alcohol. Place the cubed pound cake in the bottom of the bowl.

2

Mix the jello by following the package instructions.

3

Pour the jello over the cubed pound cake. The jello should cover the pound cake cubes. If it doesn't, make some more jello and pour overtop until just covered.

4

Put in the fridge until set.

5

Mix up the custard powder following package instructions. Let the custard cool down a bit, to about room temperature. You don't want the custard too hot or it will melt the jello when you pour it on top.

6

Pour the custard over the jello-pound cake mixture.

7

Put back into the fridge until cold.

8

Whip the cream until stiff peaks form. Half way through whipping, add sugar to taste, about 2-3 tablespoons. It should taste sweet.

9

Cover the bowl with saran wrap and place back in the fridge until cold. Decorate with sprinkles, or fresh fruit on the top.

Notes

The amounts for this trifle are very flexible and are completely dependent on the size of your bowl. Ideally, each layer should be about 1/3 of your bowl.