Browsing Tag:

vegan

Cooking

Jamie Oliver-inspired Chimichurri Sauce

chimichurri sauce

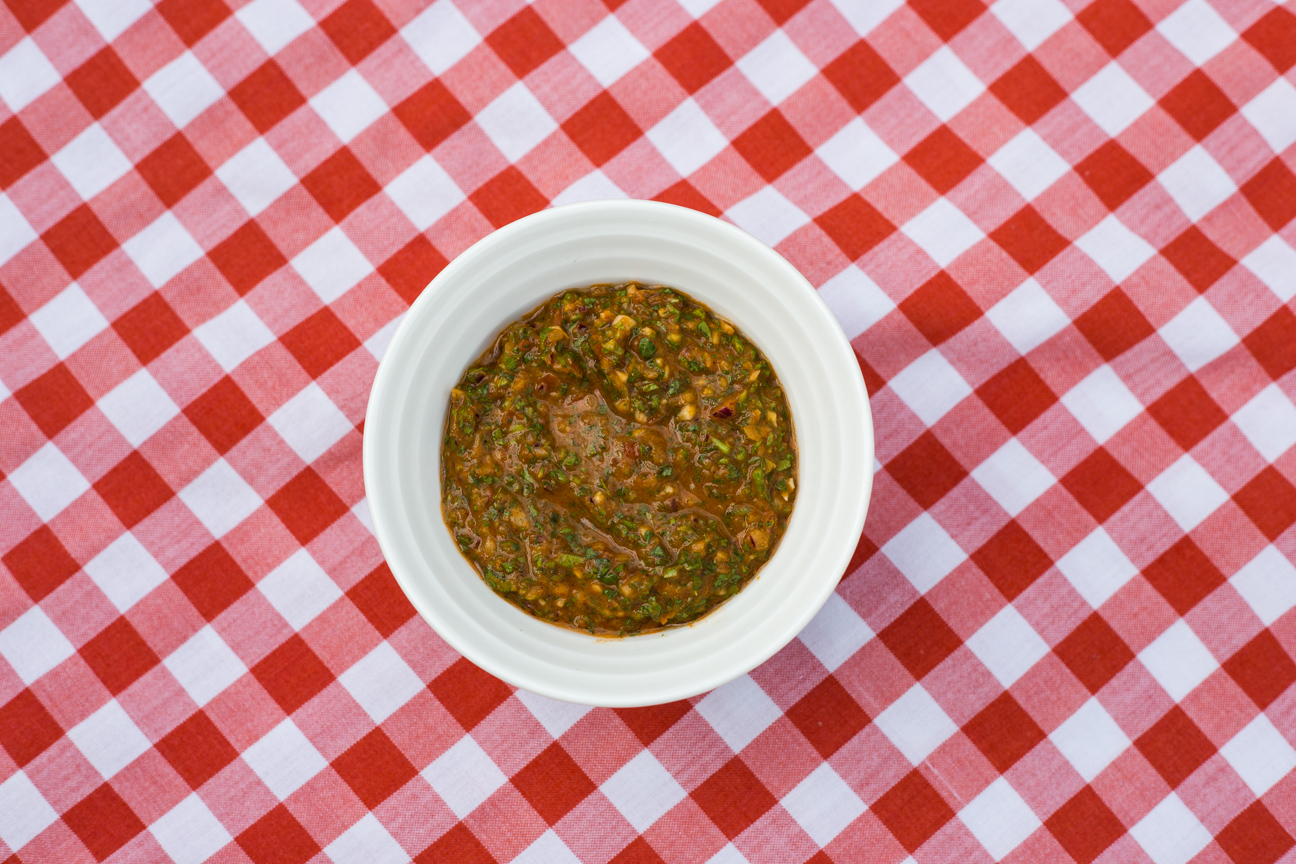
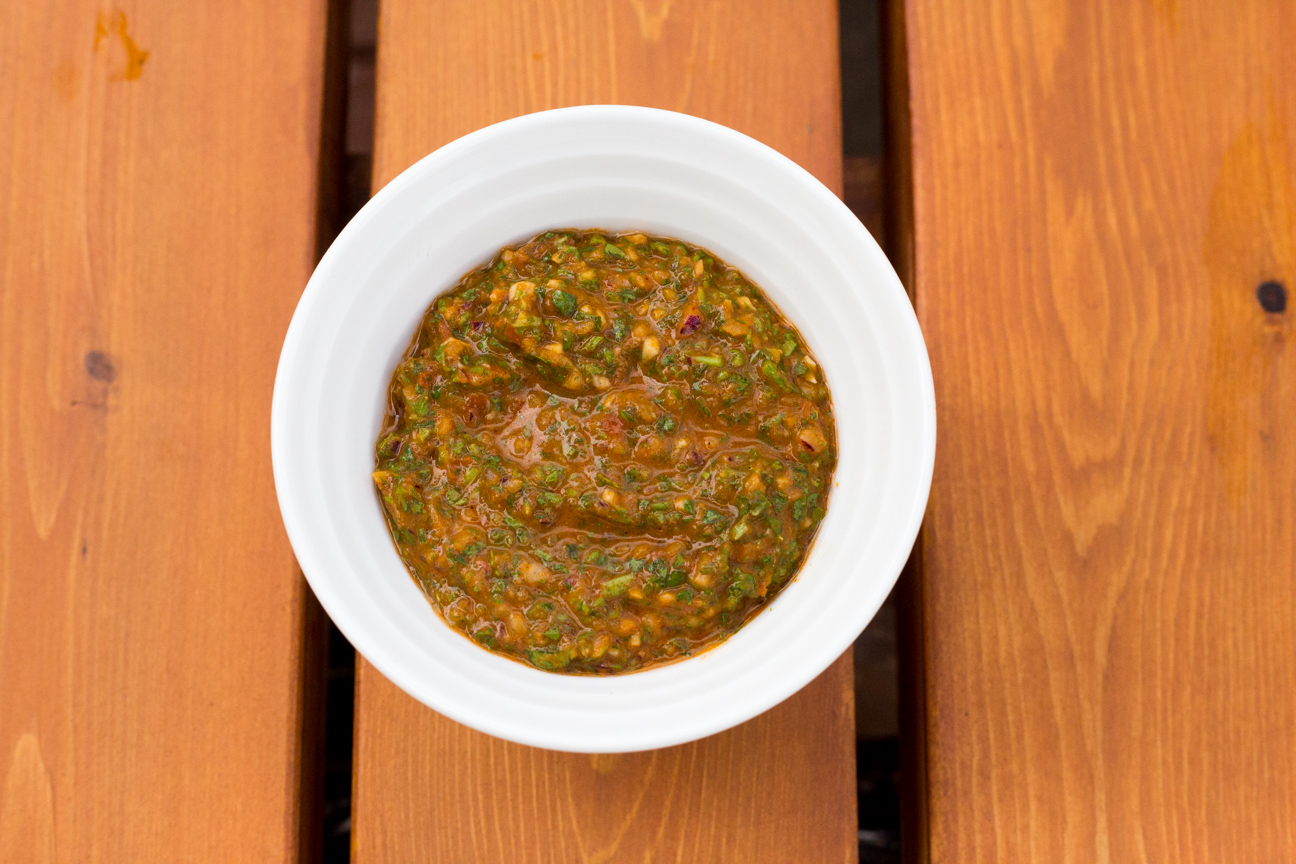
If you’re unsure what to serve up for Father’s Day this year, try making a batch of Chimichurri Sauce. You won’t regret it! Chimichurri is an uncooked Argentinian Sauce that is made from parsley, tomatoes, garlic, olive oil, vinegar and spices. It has an incredible vibrant fresh flavour.

The first time I made chimichurri was about 9 years ago when my husband’s niece and partner came to visit from Vancouver. I bought some really nice strip loin steaks and Luke grilled them on the BBQ. None of us had ever heard of chimichurri sauce before. But since then, it’s the only thing we serve with BBQ steak or chicken. But, it’s also fantastic on a pasta salad.

Nothing is better at our house, on Father’s Day, than some grilled steaks with a fresh batch of this Jamie Oliver-Inspired Chimichurri Sauce. Father’s Day dinners are always fun: with Luke barbecuing in the backyard while I’m bustling about in the kitchen making chimichurri, a special salad and a tasty dessert.

fresh vegetables and spices

I usually use roma tomatoes, as they are more dense. And I scrape out all the seeds. You don’t want the chimichurri sauce to be too watery from the pulp of the tomato. And make sure you use flat parsley. It has much more flavour than curly parsley. And feel free to adjust the seasoning to your lik8n*. If you want more garlic, some heat or more onion – go for it.

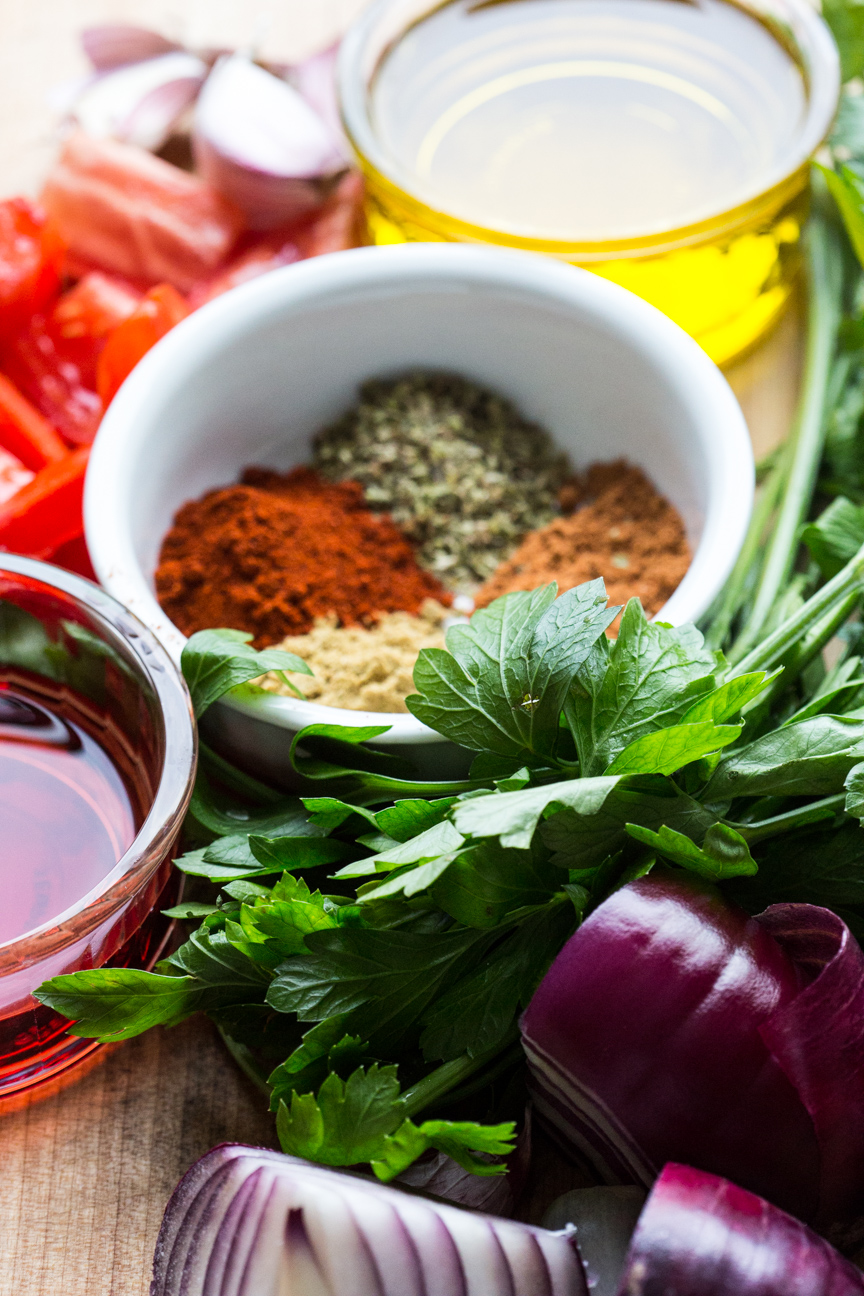
As for spices, try to use the best spices you can find as this dish will taste loads better. I have been ordering spices from The Spice Trader in Toronto, recently. Their spices are really good (this is not a sponsored post), so fresh and full of flavour and they come in lovely little tins. My husband and I love their spices.

In the past, I have always chopped all the ingredients by hand, but if you have a food processor, you can use that. If chopping by hand, try to chop everything as much as you can, so the tomato, parsley, garlic and onion get chopped very small.

This chimichurri tastes best if you make it about 1-2 hours before serving it. Keep it in the fridge to let all the flavours mingle and get to know each other.

chimichurri sauce

Enjoy!

Chimichurri Sauce

Serves: 8
Cooking Time: no cooking

Ingredients

  • 2 tomatoes (scrape the seeds out, and chop fine)
  • 1/4 to 1/2 red onion (chopped fine)
  • 3-5 garlic cloves (chopped fine)
  • one large handful of flat parsley (chopped fine)
  • 1/2 cup oliver oil
  • 1/4 cup red wine vinegar
  • 1 tsp ground cumin
  • 1 tsp chili powder
  • 1 tsp paprika
  • 1 tsp oregano

Instructions

1

Chop, chop, chop all of the herbs and vegetables until very fine, especially the parsley.

2

Add the olive oil, vinegar and spices.

3

Stir.

4

Let the marinade sit in the fridge for at least one hour.

5

This marinade is super delicious served over barbecued steak. It is also tasty with chicken.

6

Refrigerate after dinner.

7

It will keep in the fridge for a couple of days.

Cooking

Sizzling Tofu with Ginger, Pepper and Garlic

ginger pepper garlic tofu

I love this Sizzling Tofu with Ginger Pepper and Garlic. It’s quick and easy to prepare and packed full of deliciousness!

Why I like Cooking with Tofu

A lot of people don’t want to cook with tofu because they think it’s too bland. Well, for me, I love cooking with it because it’s a fantastic vehicle for absorbing flavours. And there are so many flavours that work with tofu: orange, sesame oil, sweeteners such as maple syrup, honey or brown sugar, or spicy flavours like sriracha, or curry.

Tofu is very versatile, like cooking with chicken, if you want something to compare it to as it doesn’t have a strong flavour of it’s own that will compete with other seasoning. You can either cook tofu in a pan after pressing, and it has a lovely soft texture, absorbing all the lovely flavours in your dish. But you can also coat it in cornstarch and whatever seasoning you desire and bake it flat on a cookie tray in the oven. It crisps up nicely with a nice soft creamy centre. This is a nice way to cook tofu for children, especially if they like things served separately on their plate, or they like to eat with their fingers. So yummy!

stir-fry ingredients

This dish is made with only 8 ingredients. Most of which you probably have in your pantry. Pick up a block of tofu in the refrigerated deli or produce section next time you do your groceries and you will have everything you need to make a quick, delicious dinner for your family.

How to Press Tofu

I always buy firm or extra firm, but I still press it. You just don’t need to press it for as long as you would with medium or soft tofu.

  • remove tofu from the package, draining away all of the liquid
  • slice the tofu through the centre of the block, so you have 2 rectangular pieces
  • cut each rectangle into bite size pieces (maybe 8 squares for each rectangle)
  • put all of the tofu pieces on a plate, and cover with another plate
  • place something heavy (non-breakable) on top of the top plate – a couple of tins of tomatoes, a bag of flour (about 3-4 pounds)
  • press the tofu for about 1 hour
  • drain away the liquid that has been pressed out
  • now you’re ready to cook with your tofu

Nutrition Facts

Tofu is very nutritious. And is a great alternative source of protein.

A 100-gram serving of tofu (about 1/4 of a package) contains:

  • Protein: 8 grams
  • Carbs: 2 grams
  • Fiber: 1 gram
  • Fat: 4 grams
  • Manganese: 31% of the RDI
  • Calcium: 20% of the RDI
  • Selenium: 14% of the RDI
  • Phosphorus: 12% of the RDI
  • Copper: 11% of the RDI
  • Magnesium: 9% of the RDI
  • Iron: 9% of the RDI
  • Zinc: 6% of the RDI
stir-fry ingredients in a bowl

I hope you enjoy my Sizzling Tofu with Pepper, Ginger and Garlic

Ingredients

  • 1 lb tofu, pressed and drained and cut into cubes
  • 1 small onion, diced
  • 8 garlic cloves
  • 2 tsp hot sauce
  • 1/2 cup cold water + 2 Tbsp
  • 2 Tbsp soy
  • 2 Tbsp honey
  • 2 tsp black pepper
  • 2 tsp cornstarch
  • 2 tsp ground ginger
  • 2 Tbsp oil

Instructions

1

Sauté onion and garlic in oil until translucent.

2

Splash in the hot sauce.

3

Mix together the other ingredients and pour into the pan.

4

Cook until thickened.

5

Add tofu last and stir gently until coated.

6

Enjoy!

Baking

Torta di Ceci with rosemary

torta di ceci with rosemary

Happy St. Patrick’s Day! And a very special Happy Birthday to my sister, Ruth. I have created this very special Torta di Ceci with Rosemary especially for your birthday!

Our Mum always baked a nice big birthday cake decorated with green icing for her birthday on St. Patrick’s Day. I baked her 17, yes seventeen, mint green birthday cakes when she turned 17. We had 17 guests and we sang Happy Birthday 17 times. That was fun.

On my blog’s one year anniversary, my sister wrote “make me something nice”. And I’ve been racking my brain since then about what to make that she would enjoy because she follows the keto diet. It was challenging but not impossible!

In the last few months I have been scouring my cookbooks, favourite blogs and websites searching for something that’s easy to make but unique and made without grains or sugar. When I found a recipe for the super yummy savoury Torta di Ceci it seemed to be the perfect discovery.

torta di ceci with rosemary

Torta di Ceci is made with chick pea flour, olive oil, water, salt and rosemary and that’s it.  And oh my! If you have never made this yourself or tried it in a restaurant you must make this recipe. It’s so so good. Torta di Ceci is crispy on the outside and creamy almost like a custard on the inside.  It is so amazing right out of the oven, you will want to eat the entire pan yourself. But, I suggest you share.

Torta di Ceci is dairy-free, gluten-free, vegan and keto-diet friendly. So you can’t go wrong when you serve this up.

In Europe, Torta di Ceci is a popular street food snack. It is found in many areas and goes by a few different names such as Torta di Ceci, Farinata or Socca in France. Traditionally it is eaten plain, although sometimes people will put rosemary on top. That’s really good. The second time I made it, I added coarse sea salt. Also really good. I think parmesan cheese would also be delicious grated on top…and I wouldn’t rule out bacon either.

torta di ceci with rosemary

I looked at many recipes for this popular snack food. The main difference between everyone’s recipe is the amount of water to use. Some recipes called for a ratio of 1:1 of chickpea flour and water. Some called for a ratio of 3:1 and some called for 4:1. My recipe uses a ratio of 2:1. I liked this flavour and texture best.

Recipes also soaked the chick pea flour in the water anywhere from 30 minutes to 12 hours. I found 2-4 hours just right. Although I have not let it soak for 12 hours. I can’t imagine the taste improving any better than what I made.

After you soak the chickpea flour and water and add some olive oil, salt and pepper, you bake the torta in a piping hot oven for about 15 minutes. So fast. torta di ceci with rosemary

Happy Birthday, Sis! Hope you enjoy your torta!

Torta di Ceci with Rosemary

Serves: 8
Cooking Time: 15 minutes

Ingredients

  • 100 grams (1 cup) chickpea flour
  • 2 cups water
  • 1 1/2 Tbsp olive oil
  • 1/2 tsp salt
  • a few good grinds of fresh pepper
  • 1 spring of rosemary
  • coarse sea salt (optional)

Instructions

1

Mix together the chickpea flour and water.

2

Let soak for 2-4 hours (covered), stirring when you think of it. (I put mine in a tupperware container and shook it occasionally).

3

Preheat oven to 450 degrees F.

4

Add 1 1/2 Tbsp olive oil, 1/2 tsp salt, a few grinds of fresh pepper.

5

Rinse the rosemary.

6

Add about 1 1/2 Tbsp olive oil to a 12 inch oven-proof skillet. Heat the oil until it is very hot, not smoking.

7

Pour the batter into the skillet. Careful you don't get spattered.

8

If the batter looks lumpy when it goes in the pan, very quickly whisk it smooth. If it still looks a bit lumpy, don't worry about it, it will be fine.

9

Cook on top of the stove for a few minutes, until it's slightly drier, but not completely dry.

10

Before you put it in the oven, very quickly scatter the rosemary and sea salt on top of the torta.

11

Put the skillet in the preheated oven on the bottom shelf.

12

Put an oven mitt by the stove, so you don't forget to put it on to remove the Torta when after it's done.

13

Bake for about 12-15 minutes, until golden around the edges and golden on top.

14

Very, very carefully, with an oven mitt on your hand, take out of the oven.

15

Let it cool on a rack or an upside down baking tray.

16

Then carefully, remove it from the pan.

17

Slice up with a pizza wheel.

18

Enjoy!

Notes

You will need a skillet that can go in the oven at 450 degrees F.

Baking

Festive Mocha, Almond, Brandy Strazzate

Mocha, Almond, Brandy Strazzate

Christmas Cookie baking has begun! I started my baking season with these Vegan Mocha, Almond, Brandy Strazzate. This cookie is normally made with Strega, a herbal liqueur from the Basilicata Region of Italy, which supposedly goes really well with chocolate. That liqueur is difficult to find where I live, so I used brandy, which I always have on hand this time of year., and which also works well with the mocha, almond flavours in this cookie.  This is a super delicious cookie, made without eggs or butter.


Mocha, Almond, Brandy StrazzateI woke up the other morning to this snowy site and decided it was the perfect day to begin my Christmas Baking.

Mocha, Almond, Brandy Strazzate

It’s never too early to start baking Christmas cookies or playing around with Christmas lights: two of my favourite winter activities.

These Mocha Almond Brandy Strazzate cookies come together very quickly. And the taste is divine. A cookie dough made with cocoa powder and chocolate chips so you get chocolate goodness in every bite. The dough also contains ground almonds + chopped almonds – double goodness again! And the espresso coffee blends with the chocolate to create than umami mocha flavour that is so powerful.

Like I mentioned above, this cookie is traditionally made in the Basilicata Region of Italy where Strega is made. I think any liqueur/liquor that goes with mocha and almonds would work. If you don’t drink alcohol, try a strong spiced herbal tea or chai. Those would work too.

Mocha, Almond, Brandy Strazzate

You can eat them plain, or sprinkled with some icing sugar. So tasty. Make a splash with your Christmas Baking this year. Try something new.

Mocha, Almond, Brandy Strazzate

Serves: 16
Cooking Time: 30

Ingredients

  • 1/4 tsp baking powder
  • 3/4 cup + 2 tbsp finely ground almonds
  • 1 tbsp roughly chopped almonds
  • 3/4 cup + 1 tbsp white flour
  • 1/2 cup dark brown sugar
  • 1 tbsp chocolate chips
  • 1/2 tbsp cocoa powder
  • 2 tsp olive oil
  • 1/4 cup brandy
  • 2 tsp espresso powder, dissolved in 1/4 c. boiling water

Instructions

1

Preheat oven to 325 degrees F.

2

Mix together the ground almonds, chopped almonds, flour, brown sugar, chocolate chips and cocoa powder and olive oil.

3

Dissolve the baking powder in 2 teaspoons of hot water.

4

Add baking powder solution, coffee, and liqueur.

5

Give it all a good brisk stir. The dough will be very wet.

6

Form into 30 gram balls (or 1 ounce).

7

Place on parchment paper about 1 inch apart.

8

Bake in oven for 30 minutes, until dried out and set. The bottom will be slightly golden.

9

After 30 minutes, remove from oven.

10

Let dry on baking tray for 2-3 minutes.

11

Remove from baking tray to cool on a rack.

12

Enjoy!

Notes

These cookies will keep in a coo, dry place or 3-5 days. Or you can freeze them for up to one month.

Recipe slightly adapted from Saveur Magazine February 4, 2013.

Cooking

Armenian Red Lentil and Apricot Soup Recipe

Armenian Red Lentil and Apricot Soup

The days are getting shorter, the nights cooler. Sweaters are coming out of their storage bins, light ones first. The heavy wool ones will come later. The rain jackets hang in the front closet. Rain boots are placed in the hallway near the door. Autumn is coming.

Cooler weather also means new menus. So, I’m filling my pantry and freezer with new ingredients for these approaching autumn days: pasta for comforting macaroni and cheese and hearty lasagna, beans for chili and soups, and dried fruit, nuts and a multitude of flours for baking – cookies, squares and pies. And I’m filling my downstairs freezer with big containers of soup stock.

vegetables for Armenian Red Lentil and Apricot Soup


This Armenian Red Lentil and Apricot Soup is a perfect seguay into our autumn menus. The earthy onions, carrots and lentils remind us of the approaching coolness, while the flavour of the sweet apricots tug at the memory of the summer weather that hasn’t completely ended.

Apricots have always been very special in Armenia, as their scientific name, Prunus Armeniaca, or Armenian prunes, shows. They have grown in Armenia for many centuries. A recent dig at an ancient village found apricot cores that were over 3,000 years old!

So, it goes without saying, that Armenians use apricots in many of their dishes.. During apricot season, women make jams, marmalades, even homemade apricot vodka. After the season has ended, apricots are places on balconies and rooftops to dry in the sun to be used whole or made into apricot leather. Armenians want their precious apricots to last until the next season.

This soup is very tasty and also very nutritious. This soup provides an excellent source of iron, protein, folate, B vitamins, Vitamins A and C as well as potassium. Not bad for one bowl of soup.

You can use store bought of homemade vegetable stock. If you want to make your own vegetable stock, you can find my recipe here.

If anyone had any doubts about vegan food – whether it’s tasty, nutritious or filling – one bowl of this soup would settle that argument. I hope you enjoy my Armenian Red Lentil and Apricot Soup.

Armenian Red Lentil and Apricot Soup

Enjoy!

Armenian Red Lentil and Apricot Soup

Serves: 4-6
Cooking Time: 40-60 minutes

Ingredients

  • 1 onion, chopped
  • 3 carrots (200 grams), peeled and chopped
  • 1 garlic cloves, peeled, crushed and chopped
  • 1/2 cup dried apricots, chopped
  • 1 tsp cumin powder
  • 1 cup tomato puree
  • 2/3 cup red lentils, washed
  • 1 litre vegetable broth
  • 1/4 tsp dried thyme
  • salt and pepper, to taste
  • 3 tbsp lemon juice
  • a handful of parsley, chopped

Instructions

1

Saute the onions and carrots. When almost soft, add the garlic, and cook until fragrant, about 30 seconds.

2

Add apricots and cumin powder and cook until aromatic.

3

Add tomato puree.

4

Then add the lentils, vegetable broth and thyme.

5

Bring the soup up to a boil, and then simmer for about 20 minutes.

6

Take the soup off the heat. Add the lemon juice, salt and pepper.

7

Either blitz half of the soup in the blender, or use a hand held mixer, and blitz a bit, but make sure it's not entirely pureed.

8

Serve in bowls with parsley sprinkled on top.

Preserves

Strawberry Lime Elderflower Granita Recipe

strawberry lime elderflower granita

Wow! I’m not sure what the weather is like where you’re living, but the forecast for tomorrow in Ottawa is 40 degrees C.  That’s hot, hot, hot! And the best way for me to stay cool in hot, humid weather is by eating fruity frozen desserts.

This Strawberry Lime Elderflower Granita is so perfect for cooling down in the heat. Granita is a frozen mixture of fruit, sugar, water. It is the simplest frozen dessert you can make. And it’s a great dessert to make with your kids.

Granita is similar to sorbet but is made without an ice cream machine. The ice crystals that form are large and coarse and will be crunchy when you take a bite, but seconds later the granita will just melt away in your mouth. Divine.

To make granita, simply puree some fruit, water, sugar and any extra flavouring you may want to use, in a blender. Pour it into a shallow tray and place in the freezer. Check on it after an hour, and if it has begun to freeze, start breaking up the crystals with a fork. Place it back in the freezer for another 30-45 minutes. Repeat this process until it is all frozen and flaky.

There are many ways to enjoy granita. Of course, you can eat it plain in a bowl. You could also have it layered with whipped cream in a parfait glass. Some people also enjoy it spooned overtop of yogurt.


strawberries for strawberry lime elderflower granita

Strawberries have always been very symbolic of summer and a perfect fruit to use in granitas. But now with day-neutral strawberries, we can buy local strawberries until the frost hits! Yay!


strawberies and limes for strawberry lime elderflower granita

Strawberries and limes go amazingly well together.

strawberies and limes and elderflower liqueur for strawberry lime elderflower granita

And when you add a few drops of Elderflower Liqueur…the flavour is heavenly.

There are so many fruits you could use in granita: blueberry, melon, watermelon, raspberry, blackberry, mango, or espresso coffee…. or mix them up and come up with your own flavour. The possibilities are endless.

Strawberry Lime Elderflower Granita

Serves: 8-10

Ingredients

  • 1 kg strawberries, hulled and sliced
  • 150 grams icing sugar
  • 1/2 lime juice and zest
  • 1 ounce of elderflower liqueur (optional)
  • 1 cup water

Instructions

1

Mix strawberries and icing sugar. Let sit one hour.

2

Place strawberry sugar mixture into a blender. Add lime juice, lime zest, water and elderflower liqueur (if using). Blitz on high until a smooth puree is formed.

3

Strain mixture through one layer of cheesecloth to remove seeds.

4

Pour mixture into a rectangular shallow container and cover with lid. Place in freezer.

5

After one hour, check mixture. If ice crystals have started to form, rake a fork through the crystals to break them up somewhat. You don't want the tray to freeze into a giant ice cube. Keep checking every 30 to 45 minutes and continue to break up the frozen parts with a fork.

6

When it's ready, the tray will be filled with fluffy ice crystals.

7

Enjoy on it's own, or layered with whipped cream, or overtop of yogurt.

Cooking

Orange Soy Honey Tofu Marinade for BBQ

cubes of tofu marinating in orange soy honey tofu marinade

We love to barbecue on the weekends, but sometimes I get tired of eating so much meat, so my husband suggested we try marinating and grilling tofu on the barbecue. I came up with this Orange Soy Honey Tofu Marinade last weekend and everyone really enjoyed it. It’s so good: it has sweetness from the orange juice and honey, saltiness from the soy and lots of extra flavour  from the ginger and garlic. Yum!

Tofu is made from coagulated soy milk. It has been made for thousands of years beginning in China. The story goes that a cook once accidentally curdled some soy milk and … tofu was born.

Tofu on its own can be quite bland. But luckily it is fantastic for soaking up the flavours of sauces and marinades. Which is why this marinade works so well with tofu. All the flavours of orange, soy, honey, ginger, and sesame oil soak right into the porous soy cubes. This marinade also works in stir-fries as a sauce with chicken or tofu if you do not barbecue, or it is raining or wintertime. Just use with your favourite stir-fry combination.

Tofu is a super healthy meat alternative. In a 100 gram serving (about 1/2 a cup) there are 70 calories, 3.5 grams of fat, 8.2 grams of protein and about 350 mg of calcium, which is about 20% of our daily needs. When compared with chicken or steak, it is much lower in calories and much higher in calcium. Tofu is lower in protein than chicken or steak, but one serving is still enough for your daily needs.

grilled tofu with orange soy honey marinade

When you grill the tofu on a barbeque, you will need a basket with holes in it (pictured above) otherwise the tofu cubes will fall through the grate. You could also use an iron frying pan. On the barbeque, the tofu caramelizes to a lovely golden brown. It’s very difficult to get this result on your stove top, as the barbeque is so much hotter. It would work, but it’s really nice on the barbeque.

Before you begin making this dish, you should press the tofu to remove any extra liquid. When pressed, the tofu is less apt to fall apart on the barbeque.  To press it, first cube the tofu. Then place the tofu in a shallow plate and cover the tofu completely with another plate. Place a weight on top of the plate. For a weight, you could use a can of tomatoes, a small bag of sugar, or anything that weighs about 1 kg. Leave the tofu like that for about 60 minutes. Drain away the liquid, then place the pressed tofu in a container with the Orange Soy Honey Tofu Marinade to soak up all those yummy flavours. Seal the container. Place it in the fridge for as long as 24 hours, and drain the marinade before cooking.

Barbecue on a medium heat until golden brown all over, turning often. Brush on additional marinade as it cooks.

Enjoy!

Orange Soy Honey Tofu Marinade for BBQ

Serves: 6
Cooking Time: 15-20

Ingredients

  • marinate the tofu between 1 hour to 24 hours before cooking
  • 1/2 cup soy sauce
  • 2 garlic cloves, finely chopped
  • 1 tbsp finely chopped ginger
  • 2 tablespoons orange juice concentrate
  • 2 tsp rice wine vinegar
  • 1 tsp mirin
  • 1 tsp sesame oil
  • 1/4 cup honey
  • 1 450 g container of tofu

Instructions

1

Press tofu to remove extra liquid. Place tofu on a shallow plate or in a shallow bowl. Place a small plate on top of the tofu. On top of the plate, place an object that weighs about 1 kg (large can of tomatoes, small bag of sugar etc.). Leave for about 60 minutes. Drain away extra liquid.

2

Chop the garlic and ginger finely.

3

Add all other ingredients into microwavable bowl.

4

Place in microwave for about 30 seconds, until the honey and orange juice concentrate are melted.

5

Stir all ingredients together.

6

Pour over tofu.

7

Place in refrigerator for about 2-3 hours.

8

Grill on medium heat on barbeque. Baste with extra marinade.

9

Turn tofu a few times until each cube is a nice golden brown.

Cooking

Vegetable Stock Recipe


vegetable stock in a jar with fresh herbs

I love making soup, especially in the winter. But to make a soup with lots of flavour, I like to make sure that I have a good hearty homemade stock in my freezer. Homemade stock to me is the best: it’s fresh tasting, you have complete control over the flavours as well as seasoning, especially the salt and it’s quick and inexpensive to make. Store bought stock has way too much sodium and too little flavour. The best stock to make, in my opinion, is vegetable stock. I stopped making chicken stock a few years ago. I find it too strong, too oily, too overpowering. So now I only make vegetable stock.

Vegetable stocks are super fast and easy to make. You can use any mild flavoured vegetable but the main ingredients that I use are carrots, onions, celery and a few herbs. And I bet most people have those ingredients in your pantry/refrigerator most of the time. You could also use tomatoes, leeks, and mushrooms. Try to use the same amount of each vegetable so that the stock has a balanced flavour.  Add some fresh herbs such as parsley, oregano, basil or thyme to brighten the flavour profile of your stock.  I don’t add any salt or pepper to the stock as I prefer to add seasoning to the final dish.

This recipe is the one I use time and time again whenever I make a batch of homemade soup – even if the soup has beef or chicken in it, I still use a vegetable stock. This is the stock I use when I make Lemon Ginger Carrot Soup or Cheddar Cheese and Apple Cider Soup.


raw-chopped vegetables

Vegetable Stock is super easy to make yourself. You can make a quick batch of stock with ingredients that you most likely have on hand. Here is a list of tips when making homemade vegetable stock:

  • use mild flavoured vegetables such as onions, leeks, scallions, carrots, celery
  • you can also use tomatoes, mushrooms or fennel
  • do not use rutabaga, potato or sweet potato as it will create a gummy texture
  • you can add in some mild herbs such as thyme, oregano, basil or parsley
  • do not use garlic unless you are making the stock for a specific recipe (or enjoy garlic in all your soups)
  • you can scrub the vegetables to remove any loose dirt, but do not need to peel (unless you would like to)
  • you can roast the vegetables in the oven for a deeper and more flavorsome stock, or brown in a pan until golden
  • simmer the vegetables in a small amount of water (just covering the vegetables) for a deep, rich flavour
  • simmer for anywhere from 20 minutes to one hour. Whatever suits your schedule.

vegetables-sauteeing-in-pan.

Brown the vegetables before simmering them in water until they have some good colour on them, as in the photo above. Browning the vegetables gives the stock a richer flavour and colour. However, if you are short on time, you can leave out this step. Just dump the prepped vegetables into a pot, add some water and simmer for 20 minutes to one hour, depending on your schedule.

After you are done simmering, strain the vegetables into another pot. Let the broth cool down to room temperature. This may take 1-2 hours. Then ladle into containers. Label the containers with the name and date. If you are storing your stock in the refrigerator, use within a couple of days.

Soup stock also freezes really well. I usually freeze my stock in various sized containers: a 3-cup container for soup, as well as a couple of 1/2 to 1 cup containers to add to sauces. You can also freeze some in ice cube trays if you want smaller amounts. If you freeze any in ice cube trays, once the stock is frozen, place the little frozen cubes of vegetable stock in a ziplock bag (remember to label the bag – I have found many unlabelled items in my freezer and had no idea what they were or how long they had been there).  Use the frozen stock within 3 months.

You’re going to love this one! Let me know what soups you make with this stock!

vegetable stock with onion and herbs

Readings to inspire you to make your own stock:

Everything you need to know about canned and boxed broth.

Store-bought Beef Broth.


Vegetable Stock

Serves: 2 litres
Cooking Time: 30 minutes

Ingredients

  • 1 onion, peeled and chopped
  • 2 large carrots, peeled or scrubbed and chopped
  • 2 celery stalks, washed and chopped
  • 1 bunch of scallions, chopped
  • 1 tablespoon olive oil
  • 8 parsley branches
  • 2 bay leaves
  • 6 thyme sprigs

Instructions

1

Heat the oil in a large pot. Add all the vegetables and herbs.

2

Saute over medium-high heat, stirring frequently. The more colour that the vegetables get, the more flavour the stock will have.

3

Once they are all nicely coloured, add 2 litres of water. Bring to a boil. Lower the heat and simmer, with the lid half on, for about 30 minutes.

4

Strain out the vegetables. Let the stock cool.

5

Pour into freezable containers. Label the containers with the name and the date.

6

If you will be using the stock within a couple days, store in the refrigerator. Otherwise place in freezer for up to 3 months.


Recipe adapted from Vegetarian Cooking for Everyone by Deborah Madison.

Cooking/ Preserves

Robust Red Tomato Sauce

pitcher of tomato sauce and tomatoes

Tomato Sauce is one of the simplest pantry items anyone can make. It also freezes beautifully. It’s so handy to have a few tubs in the freezer so whenever I have time to make some sauce, I make double or triple the amount and freeze it for a quick dinner.

You can make SO many quick dinners when there is a ready made tub of tomato sauce in your freezer: pasta + sauce + parmesan cheese; pasta + sauce + sausage; pasta + sauce + any green vegetable from the crisper drawer such as spinach, zucchini, or even just onion or garlic; or tortellini + sauce + parmesan. Homemade sauce is so simple, and so much tastier than store bought that I try not to purchase bottled sauce too often. It is also more economical and healthier as there is much less salt.

This Robust Red Tomato Sauce is my go-to sauce for all pasta or pizza dishes. I love it because it has a very deep rich tomato flavour. I know other people like to add onions, garlic and sometimes carrots for sweetness, but I like the rich tomato flavour scented with only bay leaves.

pitcher of tomato sauce and tomatoes

If you are lucky enough to have a vegetable patch in your yard, or perhaps you rent an allotment garden, you could try growing your own tomatoes. Tomatoes used to make sauce are a different variety than eating tomatoes. You’ll want to look for paste tomatoes. Paste tomatoes have fewer seeds and have a firmer texture. They also all ripen at the same time, so processing the tomatoes into sauce is easy. Paste tomatoes may seem a bit bland when eaten raw, but when cooked down, they turn into a delicious sauce. Some varieties to look for are: San Marzano, Amish or Roma.

Personally, I buy whatever tins of tomatoes are on sale at the local grocery store. I also tend to buy tins with No Salt Added. However, if I am making a special pasta dish for guests or perhaps taking a lasagna to someone’s house, I would search out a more expensive brand such as Muir Glen, Eden Organic or San Marzano tinned tomatoes. These tomatoes do tend to have a richer and pastier texture. And the taste is divine.

Winter is the perfect time for making tomato sauce and all the accompanying pasta dishes. So, next time you’re at the grocery store, pick up a few tins of tomato sauce and simmer them on the stove while you browse through your favorite italian cookbook and bookmark a few italian dishes to make with your gorgeous homemade tomato sauce.

pitcher of tomato sauce and tomatoes

Robust Red Tomato Sauce

Serves: 4-6
Cooking Time: 1 hour

Ingredients

  • 1 can (796 ml) whole tomatoes (I use no salt added, but you can use either)
  • 2 bay leaves
  • 1 small can tomato paste

Instructions

1

Empty the can of tomatoes into a large pot. Squish all the tomatoes with your hands until well broken up.

2

Add two bay leaves.

3

Simmer on low for about 30 - 40 minutes, until reduced by about 1/3, with the lid half covering the pot.

4

Add tomato paste to taste. I usually add about 2-3 tablespoons.

5

Add salt and pepper to taste.

Notes

This recipe multiplies well. Increase the cooking time to about an hour for large batches. It should reduce by about 1/3.

Preserves

Vegan Roasted Red Pepper Pesto Recipe

roasted red pepper pesto in a bowl

January is a great month to make changes to your daily life. Maybe you want to hit the gym more often, go to the theatre or read more books. This year, I’m going to be cooking a lot more vegetarian and vegan recipes. I’ve been experimenting lately with some different dinner ideas and they have all gone down a treat. This vegan roasted red pepper pesto caught everyone offguard with it’s smoky flavour and heat from the chipotle.

Eating less meat and more vegetables is a much healthier and more economical way of dining. I found this recipe recently in Meatless: More than 200 of the Very Best Vegetarian Recipes and everyone in the family loved it.

I was a vegetarian for a few years when I was a teenager. Eliminating meat from my diet was easy, but back then, there were not many resources to inspire me to make interesting meatless meals. To make sure that I got enough protein in my diet, I ate a lot of eggs and cheese, and salty sunflower seeds.

Nowadays, there are SO many amazing vegetarian ideas. I love Buddha bowls, vegetarian curries as well as all the wild variations on pesto.  I love the influence that international cuisines bring to vegan and vegetarian dishes. Spices and techniques from Thailand, Vietnam, India or South America really liven up our local veggies. We’re so lucky that international restaurants, recipes and ingredients have become more prevalent.

While I am familiar with vegetarian diets, the vegan diet is new to me, and perhaps to other people as well.

This vegan roasted red pepper pesto is amazing with it’s smoky hot chipotle peppers and nutty almonds. It does have quite a kick to it from the chipotle pepper. If you are serving this to anyone who does not like spicy food,  decrease the chipotle pepper to 1/4 or 1/2 and add an extra half roasted red pepper. It is delicious on pasta, but you could also spread it on crackers, or a bagel or have as a dip with veggies.

roasted red pepper pesto with ingredients on a cutting board

Vegan Roasted Red Pepper Pesto

Serves: 6
Cooking Time: 10 minutes

Ingredients

  • 2 large roasted red peppers
  • 1 chopped jarred chipotle chile in adobe
  • 1 chopped small garlic clove
  • 2 tablespoons toasted almonds
  • 1 teaspoon fresh oregano
  • 2 tablespoons olive oil

Instructions

1

Place all the ingredients in the food processor, EXCEPT the olive oil. Pulse a few times until roughly chopped.

2

Add the olive oil and blend until everything is mixed together.

3

Season with salt and pepper.

4

Boil up 450 grams of spaghetti. Follow package instructions for timing.

5

Toss the spaghetti with the pesto.

Notes

To toast the almonds, spread them on a parchment lined baking tray and pop them into a preheated 350 degree C oven. It takes about ten minutes for them to toast.

If  you are interested in further reading on vegan diets, here is some additional reading. Enjoy!

The Vegan Society

History of Veganism