Browsing Category

Cooking

Cooking

Quick and Easy Fruit Salad with Lime Syrup

raw fruit for fruit salad

This Quick and Easy Fruit Salad with Lime Syrup is just the thing to have in your fridge this time of year! I just love it! It’s the perfect snack for me to have all ready-made in my fridge. Especially after all the recent Easter Feasting. It’s not completely necessary to have a recipe for a fruit salad, but I always find it helps to motivate me towards making one.

Back in the day, when we used to go on vacation, the hotels we stayed at inevitably always had a huge bowl of fruit at the breakfast buffet. And every vacation, I would decide that when I got home, I would make a big bowl of fruit salad every week. Of course, this is harder to achieve when you have a large family, but occasionally I do have a nice big fruit salad in there, at least for a few days. And we all enjoy it!

What I especially love about this salad, is the lime syrup that I pour over top. It really powers up the flavours, and makes it more than just your average fruit salad. The lime juice also helps preserve some of the fruits.

What other fruits are good in salad?

  • bananas are very nice, but add them individually, as they will go mushy mixed in with the other fruits and stored in the fridge
  • mango is very nice and will keep quite well
  • berries are fantastic in a fruit salad. I tend to just choose one berry, as they can be expensive when not in season. Also, berries such as raspberries and blackberries can be quite delicate and fall apart easily. You could sprinkle those on top of your bowl, if you don’t like them falling apart.
  • pink grapefruit are also very good. If you were going to use pink grapefruit, I would swap out the oranges for pink grapefruit. They are a little more tart than oranges, but would go nicely with the other fruits.
  • Kiwis are also very delicious. The green colour is a lovely contrast with all the other fruits. If you want an extremely colourful fruit salad, add some kiwis.

How do I know when fruits are ripe?

  • Pineapple: Pineapples are ripe when they are a lovely golden/yellow colour. They should also not feel rock hard. Solid green, rock hard pineapples are not ripe. Pineapples don’t continue to ripen much after they are picked, so try to choose a good one at the store.
  • Strawberries: Strawberries also don’t ripen after they are picked. You want to choose nice bright red strawberries. Look for strawberries that have healthy green leaves on top and no white at the top of the berry. If you’re buying them in a clear plastic box at the grocery store, check all sides of the container to make sure there aren’t any that have blackened or are mouldy.
  • Kiwi: To test a ripe kiwi, press slightly on the skin. It should give slightly when you press on it. A ripe kiwi should have brown fuzz overtop of brown skin. If the skin is green, it is not ripe. However, kiwis ripen up very well on the kitchen counter. So, if the kiwis that you buy are not ripe, you can set them in a bowl on the counter for a few days until they ripen up.
  • Bananas: Bananas are ripe when they are yellow. If you can only find green bananas at the grocery store, that’s ok. They will continue to ripen on your kitchen counter. Don’t keep bananas in the fridge as they will turn black. If your bananas become spotted with black specks, they are still good to eat, and even more perfect to cook with. You can bake with them right away, or you can freeze over-ripe bananas in the freezer until you are ready to bake.
  • Mango: There are many different varieties of mango that are available at the grocery store. A mango that is ready for eating, is semi-soft. If it’s rock hard, it’s not ready. But mangoes will continue to ripen after they are picked. If you buy rock hard mangoes, put them on your kitchen counter for a few days until they ripen up.

3 Reasons why I prefer having a bowl of Fruit Salad over individual fruits

  • no peeling; the washing and peeling is already done
  • no chopping; fruit salad is ready to eat on the spot or pack up right away for healthy lunches
  • it’s a healthy food choice for the whole family; also introduces new fruits to little ones

How long does fruit salad last in the fridge?

Fruit salad will last a good few days in the fridge, up to four or five. The strawberries in the fruit salad will get a bit soft, so you could also add those individually, if that bothers you. Personally, I don’t mind. But the grapes, pineapple and oranges keep very well in this fruit salad, which is one reason why I like that combination.

Tips for Making a Fruit Salad

  • always make sure your fruit is perfectly ripe. That way your fruit salad will keep longer and taste the freshest and most sweet.
  • cut fruit into uniform size, you want to be able to get a mix of fruit in every mouthful
  • use a variety of colourful fruits, for eye-popping colour
  • for a beautiful presentation; you can layer the fruits individually in a glass bowl or trifle dish. Stir it around just before serving.
  • Fruit salad is delicious on its own, but it’s also very good with yogurt (plain or fruit flavoured), vanilla ice cream, sherbet or a dollop of whipped cream.
fruit salad in a bowl

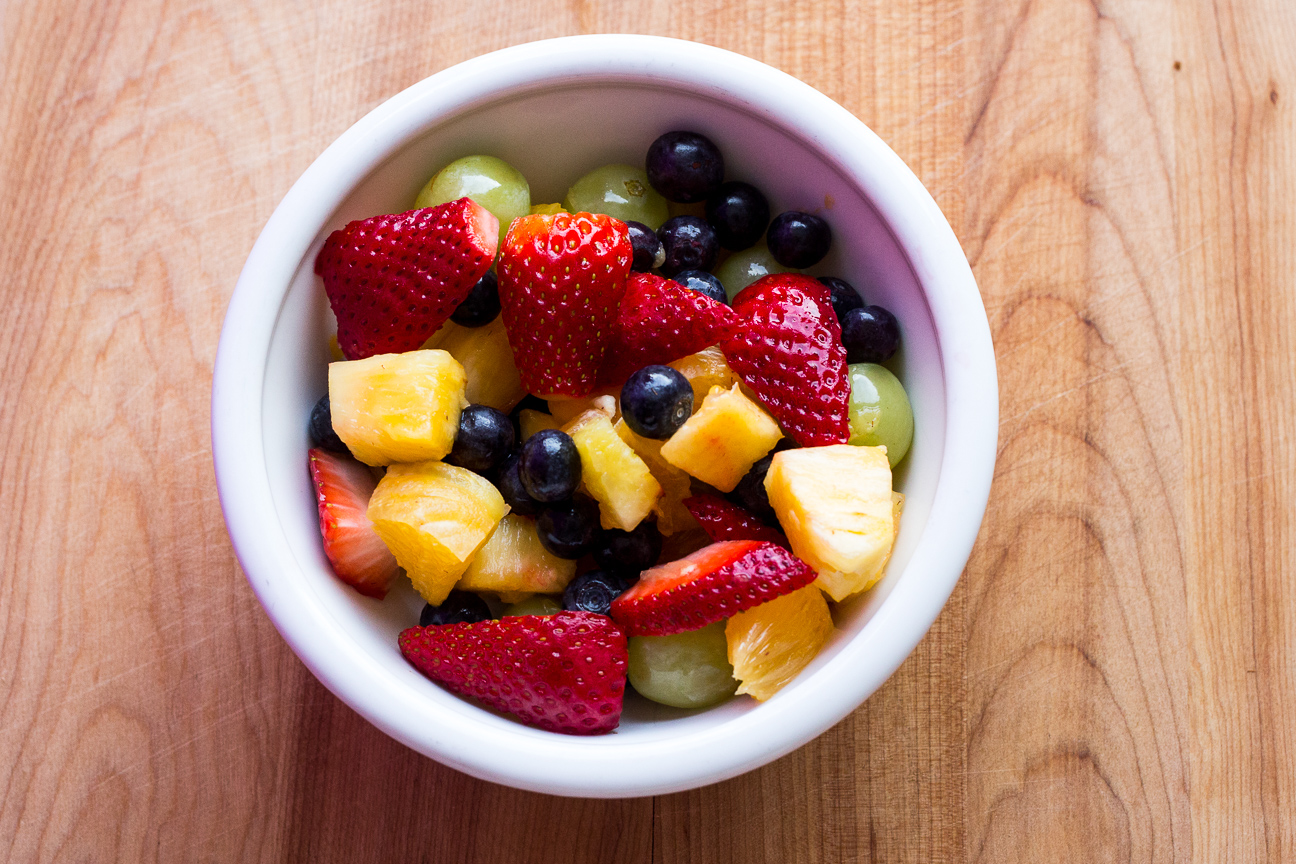
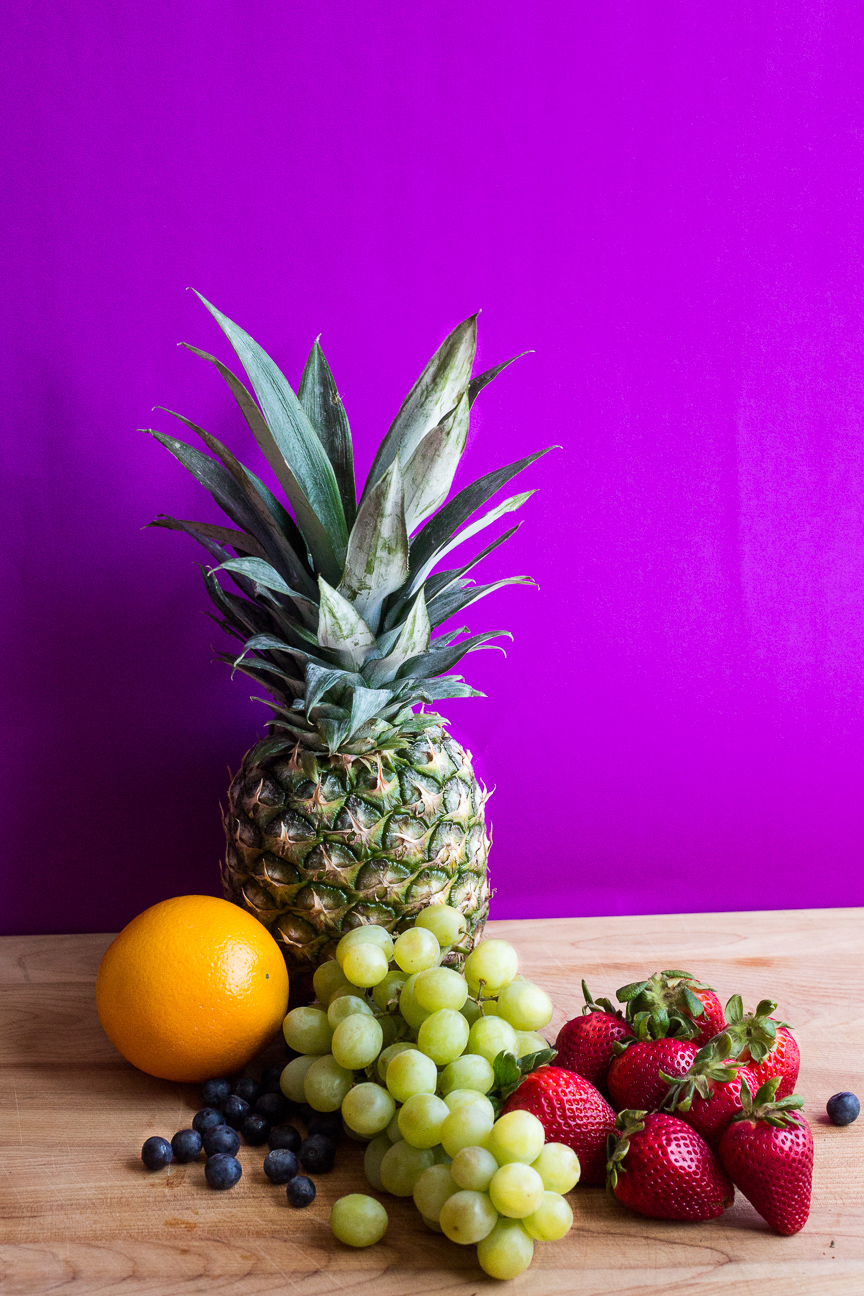
My Quick and Easy Fruit Salad makes quite a lot, if you use the same fruits that I did. What I love about this fruit salad, is the combination of pineapple, grapes, strawberry, oranges and blueberries. The flavours go amazingly well and these fruits are available year round. This combination of fruit also keep quite well with the lime syrup. However, after a couple of days, the strawberries may get a big soft. But I never mind, they’re still delicious.

I hope you enjoy my Quick and Easy Fruit Salad with Lime Syrup. Let me know if you make one yourself, and what fruits you choose.

Quick and Easy Fruit Salad with Lime Syrup

Serves: 12

Ingredients

  • 1 Pineapple, peeled, cored, and cut into bite-sized pieces
  • 1 large bunch of grapes (about 3 cups)
  • 1 box of strawberries (about 12)
  • 1 pint blueberries (about 1 1/2 cups)
  • 2 oranges, peeled and cut into bite-sized pieces
  • Lime Syrup
  • 7 tablespoons lime juice
  • 7 tablespoons water
  • 3 tablespoons sugar

Instructions

1

Wash and chop fruit.

2

You can cut the grapes in half if you like.

3

I cut the strawberries into quarters because they were quite large. You can also cut them just in half if they're not too big.

4

The important thing is to have all the fruit pieces in uniform bite-size pieces.

5

Place in a bowl or container to keep in the fridge.

6

This makes about 12 cups of fruit salad.

7

Lime Syrup

8

Add water, lime juice and sugar into pot.

9

Boil until reduced a bit and slightly thickened.

10

Place the syrup in a container and place in the fridge until cold.

11

Once cold, pour over the fruit salad.

Cooking

Greek Lemon Potatoes with Oregano

lemon potatoes baked in a pan

Happy Easter! Lately, I have been really craving potatoes. I love potatoes any style: baked, boiled, fried or roasted. But, I have to say, these Lemon Greek Potatoes are one of my favourites. They have a lovely creamy texture. And they are loaded with lots of lemon, oregano, and garlic flavours. So good.

I’m a huge fan of Greek food; greek salad, feta cheese on anything, oregano, olive oil, lemon, garlic flavours. I love all of those. If you are too, then you might want to check out my Greek Horiatiki Pasta Salad or my Alevropita Feta Tart.

My Lemon Greek Potatoes are quite simple to make, but you do need a bit of time. They are baked in the oven for a little over an hour. Of course, the great thing about baking in the oven is that it’s hand-free and you can spend that hour washing up, setting the table, finishing dinner or relaxing while someone else does all of that.

With only a few ingredients, this dish is so so simple to prepare. I like to use yukon gold potatoes because they turn out soft and creamy without falling apart.

What’s the difference between Yukon Gold Potatoes and Russett Potatoes?

Yukon Gold Potatoes are waxy potatoes. They are slightly sweet and have a creamy, moist texture. Yukon Gold potatoes are good for roasting, making french fries or just boiling. They retain their shape well. A very good, all-purpose potato.

Russett Potatoes have a neutral flavour. Russett Potatoes are considered starchy potatoes. They are best for baking, french fries or mashed. But they do not hold their shape very well, for example: for gratins or potato salad.

How do I know when my potatoes are done?

They are done when the potatoes are very soft. You can test this by poking them with a butter knife. There should be no resistance.

I cut each of my potatoes into quarters. I like this shape because the potato pieces seem to cook evenly. You could also cut them lengthwise, if you prefer. But, it’s personal preference. If you do cut them lengthwise, they may cook quicker.

Place all of your ingredients in the baking dish. Stir everything all around (I used my hands).

After a good mixing, all of the ingredients will be uniformly spread out in the pan. Cover your pan completely with tin foil and then pop it in the oven and check on it after about 45 minutes.

After about 45 minutes, the potatoes should be very soft and a fair bit of the liquid evaporated. If this is not the case, cover your pan back up and place in the oven until the potatoes are very soft (check them every 10-15 minutes, until very soft).

Remove the tin foil when the potatoes are very soft. Place the uncovered dish back in the oven for about 20 minutes. Continue to cook until the potatoes are starting to dry out and most of the liquid has evaporated.

Lemon Greek Potatoes go well with a number of dishes, but I especially like them with pork or chicken or vegetarian entrees.

If you’re a real potato lover like me, here is a great post to read about all the different types of potatoes.

A guide to every type of potato you need to know

Enjoy!

Cooking

Easy Paneer Makhti Curry Dinner

Twice a year, my Ottawa girlfriends and I go out for a curry dinner at our local Indian Restaurant. The first time we went out for dinner, we talked and laughed for so long, the chefs were sitting by the door waiting for us to finish up. I don’t think any of us had talked and laughed so much! While we are truly missing those get togethers right now, this Easy Paneer Makhti Curry Dinner is a reminder of many happy evenings sipping wine, sharing various Indian dishes and a lot of laughter.

Over the years we have tried almost everything on the menu and now have a good list of favourites. And Paneer Makhti is top in our list. My Easy Paneer Makhti Curry Dinner is a simple creamy tomato sauce, perked up with warm spices of curry powder, chili powder and cumin, with a handful of roasted cashews and a drop of whipping cream and served over jasmine rice. It is one of the simplest curry dishes you could ever make from scratch and is oh, so delicious!

paneer makhti curry dinner in a bowl

The name of the dish comes from the type of Indian cheese called paneer. Paneer cheese is a fresh cheese that is common in India. It doesn’t melt, so the cubes of paneer cheese will stay intact in the sauce. It has a mild flavour and a lovely texture that is rich and creamy. I buy my paneer at the local grocery store although it is easy to make yourself, if you want to try. Here’s my recipe for paneer cheese.

This dinner is so easy to make. It’s so warm and cozy – just what we all need these days.

What are your favourite curry dinners?

Philippa, Alison, Michele, Karin and Renée – this dish is for all of you. Can’t wait for our next curry dinner!

Easy Paneer Makhti Curry Dinner

Serves: 4
Cooking Time: 45 minutes

Ingredients

  • 15 raw or toasted, unsalted cashews
  • 1 onion, finally chopped
  • 1/2 inch of fresh ginger, chopped
  • 3 garlic cloves, crushed and chopped
  • 2 fresh, ripe tomatoes, chopped
  • 1 796 mL can of whole tomatoes
  • 2 Tbsp whipping cream
  • 1 tsp curry powder
  • 1 tsp chili powder
  • 1/2 tsp cumin
  • 1 tsp salt
  • freshly ground pepper to taste
  • 1-2 packages of paneer cheese, cut into bite-sized cubes. One package would be fine, but if you really like a lot of the cheese, use two packages. (available in the dairy section of the grocery store. I usually find it in the fridge with cream cheese, sour cream etc.)

Instructions

1

If the cashews are raw, toast them in a dry frying pan for a few minutes. If you have roasted, unsalted cashews, they will get added later. Remove cashews after they are toasted and put aside.

2

Saute onion, ginger and garlic until the onions are soft and the mixture is aromatic.

3

Add cashews and tomatoes.

4

Simmer for about 10 minutes until the tomatoes are soft.

5

Puree this mixture in a blender until very smooth, about 3 minutes on a high setting. You can wait for the mixture to cool down a bit before you put it in the blender, or I place a triple folded tea towel on top and hold the lid. Otherwise, the steam from the hot mixture may blow the lid off, and you could get scalded and/or make a huge mess.

6

Return this mixture to your pan. Add all the spices and let it simmer for a few minutes.

7

Stir in the whipping cream.

8

Add the cubed paneer cheese and continue to heat on a very low simmer, until the cheese is warm. About 10 minutes.

9

Serve with naan or pita bread and jasmine rice. So good.

Cooking

The Best Mango and Ginger Chutney

mango chutney ingredients on cutting board

My fridge is usually filled with an assortment of bottled sauces, condiments and curry-type pastes. Some items I use every week, and others are more of a one-off, which means they sit there for quite awhile until I decide to make that one dish again. I like to have a jar of chutney in my fridge at all times. I really miss it when I run out. This recipe for The Best Mango and Ginger Chutney makes a very versatile chutney.

What is Chutney

Chutney is a spicy condiment made from fresh and or dried fruit, vinegar, sugar and spices. It has a sweet sour flavour from the combination of sugar and vinegar, and can be made as spicy as you like. I like to use white wine vinegar and white sugar because I like my chutney to be light. But I have also made with chutney with demerarra sugar and apple cider vinegar and it turns out lovely.

Chutney is traditionally flavoured with warm earthy spices such as cinnamon, cloves, ginger or allspice. I like my chutney on the milder side, but you can add chilies if you want it hot.   

In the past, I would spend a whole day making a dozen or more jars which I would seal and keep for months in my cupboard.  But with this recipe I can make a large jar of chutney in under an hour and then pop it into my fridge for our next family dinner.

How do you use Chutney?

I love to serve chutney with grilled cheese sandwiches, deli sandwiches or roast chicken, pork roast or with a fancy roast  turkey dinner. It is also good with savoury meat pies. I also love it in my Tangy Mango Coronation Chicken Sandwiches.

Of course, you can buy chutney at the grocery store now, but I love making Mango and Ginger Chutney. It is so easy to make, and no exotic ingredients! It also smells divine while it simmers on the stove. If you would like to make your own chutney, read on for the recipe.

When did you first make Chutney?

The first time I made chutney I was in my 20’s. I found a cookbook at The Cookbook Store on Yonge Street in downtown Toronto called Gifts of Food by Susan Costner. I still have this cookbook, I love it so much. It is filled with recipes for chutney, flavoured oils and vinegars, flavoured butters and savoury and sweet sauces. That year, I thought it would be great fun to make some of these preserves for Christmas gifts. Once I started making chutney, I couldn’t stop. For days on end, my Mum’s kitchen was filled with the steamy aromas of brown sugar, apple cider vinegar and a mixture of spices. I was in heaven!


mango chutney ingredients on table

My Mango and Ginger Chutney is made with seven mostly pantry ingredients.  The only special ingredient that I have to buy is crystallized ginger, but even a regular grocery store sells that now.

mango chutney ingredients in a pot

Does Chutney take all day to make?

Chutney is actually super super easy to make. And like anything homemade it’s cheaper and more flavorful than store bought by a long shot. The other thing that I like about homemade chutney is that you can adjust the sweetness and spices. Store bought chutney can be cloyingly sweet. 

Ok, you see that photo up above? That’s all the ingredients for one large jar of chutney. In one pot. And, as you can see, I’m using frozen mangoes – couldn’t be much easier than that.

mango chutney ingredients with a funnel

After cooking for about 20 minutes, let the chutney cool in the pot for 5-10 minutes. Then it’s ready to pour into a well-cleaned 500 mL preserving jar. Let the chutney come to room temperature on your counter, so you don’t warm up the inside of your fridge. Once the jar is close to room temperature, you can place the jar in the fridge.

mango chutney in a jar

Hope you like it.

Enjoy

The Best Quick and Easy Tangy Mango and Ginger Chutney

Serves: 500 mL
Cooking Time: 20 minutes

Ingredients

  • makes 2 cups or 500 mL
  • 1/3 cup sugar
  • 1/3 cup apple cider vinegar
  • 2 cups mango (fresh or frozen, cut into 1/2 inch pieces)
  • 1/3 cup onion, diced
  • 2 tbsp raisins (chopped)
  • 1 tbsp finely chopped crystallized ginger
  • 1/4 tsp garlic, finely chopped

Instructions

1

Chop the raisins, onions, crystallized ginger and garlic into small pieces.

2

Pour the sugar and vinegar into a medium size pot. Add the mango and the rest of the ingredients.

3

Simmer on medium heat with the lid on for about 20 minutes.

4

You can take the lid off for the last few minutes.

5

Its ok if it cooks down a bit, but you don’t want it to dry out.

6

Let the chutney cool in the pot for a bit.

7

Pour the chutney into a container (warm glass mason jar, or another container).

8

Store the chutney in the refrigerator for up to two weeks.

Cooking

Tangy Mango Coronation Chicken Sandwiches

coronation chicken sandwich
Happy 75th Anniversary of Victory of Europe Day!

I have always loved VE Day because I remember my Mum telling me many stories of VE day and how happy everyone felt. Or perhaps she told me the same story many times over. It doesn’t really matter. I just loved hearing about that day. She used to tell me about the huge street party they had the following day in front of her Aunt Annie’s house in Birmingham, England. All the neighbours brought out tables and chairs onto the front lawns. They ate sandwiches, drank tea and lemonade, sang songs and danced into the night. A victorious celebration.

World War II Victory of Europe Street Party

This is the photo my Mum used to show me when I was small. I loved looking at it because everyone looks so happy.

Britain had many food rations during the war years:  tea, sugar, jam, meat and eggs plus more and I can only imagine how ecstatic everyone would have felt to be all together eating homemade sandwiches and drinking hot tea.  I also love how each table is decorated with tablecloths and real china and tea cups and saucers.

My Mum always loved a good party, and this day was no exception. Everyone from the neighbourhood was there:  the very young soldiers, the wee kids who were born during the war, and lots of happy mums, wives, sisters, daughters helping out with the food and drinks. It’s hard to believe the magnitude of joy, relief, and pure happiness that all of these people felt on that day. Because they were finally safe. Their boys and men were coming home.

To celebrate VE Day, I am making Tangy Mango Coronation Chicken Sandwiches. Coronation Chicken Sandwiches were actually created for Queen Elizabeth’s Coronation in 1952, but they are popular for street parties, so I thought they would be appropriate for today. These Tangy Mango Coronation Chicken Sandwiches are made with cubes of cooked chicken, mayonnaise, curry powder and mango chutney all sandwiched between wholemeal bread. So good!

mango chutney ingredients on table

The one crucial ingredient for Tangy Mango Coronation Chicken Sandwiches is mango chutney. It just wouldn’t taste the same without it. If you don’t have any, which I didn’t, you can make your own (my recipe is below, you will need to make it one day beforehand). You only need one tablespoon of chutney for about 3 cups of cubed chicken, but you do not want to leave it out. It’s essential! Trust me!

Making your own chutney is so easy. If you’ve never made your own chutney, here’s how you do it:

mango chutney ingredients on cutting board

To make your own mango chutney, chop up onions, raisins, garlic and ginger into small pieces. You can leave the mango in bigger chunks.

mango chutney ingredients in a pot

The next step is to throw all the ingredients into a pot and simmer. After cooking everything for 20 minutes or so, all the ingredients will have cooked down and look soft and smell gorgeous.

mango chutney ingredients with a funnel

When everything is done, let your chutney cool down a bit. After the chutney has cooled for a bit, pour it into a clean and warm mason jar (if it’s cold, it may crack). It’s easier to pour it into your mason jar with a funnel. If you don’t have one, you can carefully spoon it into the jar.

mango chutney in a jar

This recipe for mango chutney makes about 400 mL.  You will have lots left over to enjoy with baked chicken, egg dishes, or a ploughman’s lunch. Put the mango chutney in the refrigerator until it’s cold. Then you’re ready to make your sandwiches.

coronation chicken salad in a bowl

To make the filling, mix together mayonnaise, mango chutney, curry powder and the chicken. You can use this in sandwiches or piled high on a bed of lettuce.

coronation chicken sandwich

Coronation Chicken Sandwiches are excellent for a backyard picnic meal. You can serve these with club soda with lemon, a shandy (traditional british drink of beer mixed with ginger ale, or a Radler (Austrian drink of beer mixed with lemonade) or a cider. Enjoy!

While the big 75th VE Day Celebrations were not able to go ahead as planned and as many people were hoping, we can still reflect in other ways.

I have added some links below, to listen to some important messages of the day.

Here are a few links to videos from May 8th, 1945. If you want to get a taste of  life on that day.

Winston Churchil

UK Street Parties and Celebrations in Pictures May 8, 1945

King George VI, May 8th, 1945 and Queen Elizabeth May 8th, 2020

Ingredients

  • Mango Chutney
  • 2 cups mangoes (I used frozen, but fresh would be fine)
  • 1/3 cup diced onion (about 1/4 onion)
  • 1/3 cup white sugar
  • 1/3 cup apple cider vinegar
  • 2 tablespoons raisins (chopped)
  • 1 tablespoon crystallized ginger (chopped fine)
  • 1/2 small clove of garlic (chopped fine)
  • Coronation Chicken Salad
  • 3 cups of cubed or shredded cooked chicken.
  • 6 tablespoons mayonnaise
  • 1 teaspoon curry powder
  • 1 tablespoon mango chutney
  • croissant, sourdough or wholemeal bread

Instructions

1

To make the chutney:

2

Chop the raisins, onions, crystallized ginger and garlic into small pieces.

3

Pour the sugar and vinegar into a medium size pot.

4

Add the mango and the rest of the ingredients.

5

Simmer on a medium heat with the lid on for about 20 minutes.

6

You can take the lid off for the last few minutes.

7

It's ok if it cooks down a bit, but you don't want it to dry out.

8

Let the chutney cool in the pot for a bit.

9

Pour the chutney into a container (warm glass mason jar, or another container)

10

Keep in the fridge.

11

Use within 2 weeks.

12

To Make Coronation chicken Salad

13

Mix together the mayonnaise, curry powder and mango chutney.

14

Add about 3 cups of cubed or shredded cooked chicken.

15

Stir together until all the ingredients are fully incorporated.

16

Serve on wholemeal bread, croissant or a bed of lettuce.

Cooking

Sizzling Mapo Tofu with Pork, Tofu and Eggplant

ma po tofu with eggplant

This recipe for Sizzling Mapo Tofu is an easy and delicious dish to make any night of the week. As preparation only takes about 10 minutes and cooking is just as fast. So, your family dinner will be on the table in no time.

Another thing that I love about this dish are the textures. I love the combination of soft eggplant, tender tofu, small pieces of pork, crisp green onions. And that fiery trio of ginger, garlic and hot sauce really hits the spot. So, this dish couldn’t be more perfect.

I’m sure you have your own go-to dinner recipe when food needs to be on the table as fast as possible. Well, Mapo Tofu is that dish for me. I have been making this dish for many many years. I just love it. It is warming, satisfying and delicious anytime of the year. And, boy, is it fast to make.

I make this dish with pork. but you could easily turn this dish into a vegan dinner by omitting the pork. Because there are so many seasonings, you won’t miss the pork.

I love reading about the history of recipes. And this one is pretty amazing. Mapo Tofu actually dates back atleast 200 years.  It was originally made by an elderly woman at The Chen Xingsheng, a small restaurant near the Wanfu Bridge in north Chengdu, the Capital City of Sichuan province in China, that she ran with her husband.

Ma means pork, and po means elderly, so mapo was actually used to describe the woman who made and served this delicious dish.

ma po tofu with eggplant

If you need a quick and delicious dinner – Mapo Tofu with Eggplant is for you!

Enjoy!

Ma Po Tofu

Serves: 4
Cooking Time: 20 minutes

Ingredients

  • Part A
  • 1 eggplant, cubed
  • 2 garlic clove, chopped
  • 2 tsp chopped ginger
  • 1 Tbsp + 1 tsp sambal oelek or other hot chili sauce
  • 300 grams ground pork
  • Part B
  • 360 ml vegetable broth
  • 1/4 cup soy sauce
  • 2 tsp sake
  • dash of pepper
  • 1 package of firm tofu, cut into cubes
  • Part C
  • 4 green onions
  • 3 Tbsp corn starch
  • 1/4 cup water
  • 2 Tbsp sesame oil

Instructions

1

Saute eggplant, then remove from pan.

2

Saute garlic and ginger and when aromatic add the sambal oelek.

3

Add pork and saute until cooked.

4

Add Part ‘B’.

5

Add eggplant back into pan.

6

Mix cornstarch with water.

7

Add mixture to pan.

8

Add sesame oil and green onions.

9

Serve with rice.

10

Enjoy!

Cooking

Argentinian Matambre with Chorizo Sausage and Spinach

It’s still winter here in Ottawa, but about 9,000 km straight south of us, Martes de Carnival is going on in Argentina. To mark this special event, Melissa Johnson from the delicious and inspiring breadandwords food blog and I have teamed together to create two variations of Argentinian Matambre: a unique, colourful and very traditional dish of Argentina.

Matambre is made from flank steak that is stuffed with a variety of herbs and vegetables and then rolled up! Matambre is really an amazing and delicious dish. There are so many flavours popping out at the same time – it’s just so so so good! You can serve it at dinner parties, backyard barbecues or as an appetizer. It’s so delicious!

Matambre literally means kill (matar) hunger (hambre). And this dish certainly does that quickly!

As Matambre is so versatile, Melissa and I decided to do two variations of this amazing Argentinian dish. Melissa’s recipe for Matambre is reminiscent of the one her Argentinian mother used to make. Her Matambre is stuffed with parsley, cheese, garlic and other colourful vegetables. Melissa seared her steak and then baked it in the oven.

For my recipe, I wanted to add some spice, so I added a layer of chorizo sausage. The spinach combined with the carrots and red peppers is divine. And who knew that olives would taste so mighty fine with steak. Well, they do. Amazing, actually! After the steak is rolled up and seared in a hot skillet, it was simmered in a red wine-based broth for 90 minutes until tender. Yum!


raw ingredients for argentinian matambre with chorizo and spinach

To make matambre, you have to butterfly your flank steak. To do this, you will need a very sharp knife, so be careful with your fingers! In the center of the piece of steak (running with the grain) cut about half way through the meat. Then make two short slits perpendicular to the main cut. Slice the steak open along the long cut. Just go easy, if you poke through, it’s not a big deal. You want this steak to open up like a book.

Now it’s time to start layering the filling ingredients. As you lay down the filling, leave a few inches at the far long end.

For my Matambre, I spread the steak with dijon mustard, leaving a one inch border. Next, spread a layer of herbs, jalapeno peppers and garlic. Then sprinkle sauteed chorizo sausage all over followed by a layer of spinach leaves. Next, make rows of the sliced red peppers, orange carrots, green olives mixed with roasted red peppers, and red onion. It will be very colourful.

Roll the steak up towards the empty long end. It may look a bit messy, and if a few filling ingredients pop out, don’t worry, you can put them back in after it is all tied up. Keep the seam side down as you start to tie it up. I used four strings across the steak, and because I wanted to simmer it on top of the stove, I also used one long one for the full length. (Here’s a great video to watch,  just scroll down to the bottom, if you want some tips on tying up your meat!)

Sear the steak on all sides in oil in a hot skillet. I simmered my Matambre, but you could also bake yours. If you’re interested in baking your Matambre, check out Melissa’s instructions to see how she baked hers.

argentinian matambre with chorizo and spinach

After about 90 minutes, when the meat feels tender, it will look sort of like this. It really stays together quite well.

argentinian matambre with chorizo and spinach

Time to slice this matambre up!


Again, get a really sharp knife, and slice your matambre. It actually slices really easily. And have a look inside. So gorgeous! Look at all those colours!!!

argentinian matambre with chorizo and spinach

All of the ingredients create a lovely pattern inside. Remember to present it on your prettiest platter. It will be a showstopper! It’s popular to serve it with chimichurri sauce. You will find the recipe below.

Try both of our recipes or mix and match: bake mine or simmer Melissa’s on top of the stove. Or choose your favourite ingredients from both recipes.

Let us know what you made and how it turned out!

Thanks so much

Melissa and Suzanne

Buen provecho!

Argentinian Matambre with Chorizo and Spinach

Serves: 4
Cooking Time: 90 minutes

Ingredients

  • 2 - 2 1/2 lb flank steak
  • 1-2 Tbsp dijon mustard (depending on the size of your steak)
  • 1 handful each parsley, watercress, and cilantro (chopped)
  • 2 Tbsp pickled jalapeno, chopped
  • 1 tsp cumin
  • 1 tsp garlic
  • 1 large handful of baby spinach leaves
  • 1 carrot, cut in quarters
  • 1 red pepper, sliced
  • about 10 large green spanish olives, sliced in half
  • 1/2 roasted red pepper
  • 2 chorizo sausages, cooked and chopped up
  • 1/2 red onion, sliced
  • Broth
  • 2 cups red wine
  • 1 1/2 tsp oregano
  • 1/2 tsp thyme
  • 1/2 tsp garlic, crushed
  • 2 bay leaves
  • Chimichurri Sauce
  • 2 tomatoes (scrape the seeds out, and chop fine)
  • 1 red onion (chopped fine)
  • 3 garlic cloves (chopped fine)
  • one handful of parsley (chopped fine)
  • 1/2 cup olive oil
  • 1/4 cup red wine vinegar
  • 1 tsp ground cumin
  • 1 tsp chili powder
  • 1 tsp paprika
  • 1 tsp oregano

Instructions

1

Butterfly the flank steak. See instructions above, or find a video on youtube (it's really easy, actually)

2

Spread dijon mustard all over the steak, leaving a 1" border.

3

Chop the parsley, cilantro and watercress together with the pickled jalapeno, cumin and garlic. Make sure they all get mixed together.

4

Spread the chopped herbs on top of the dijon mustard. Leave 2-3 inches at the far, long edge of the steak empty. This makes it easier to roll up.

5

Spread the chorizo sausage on top.

6

Layer the washed baby spinach leaves on top of the sausage.

7

In rows, running along the grain of the meat; place the olives, carrots, red pepper. You can do thick rows, repeating rows etc. But try not to overstuff, or it will be difficult to roll.

8

Roll the steak, and leave it on the cutting board while you get ready to tie it up.

9

Cut about 4-5 pieces of butcher's twine and tie the twine around the steak. I used one extra long one to tie from end to end because I simmered it on top of the stove and I didn't want anything to fall out.

10

Heat up a bit of oil in a large skillet. Sear the steak on all sides, until all sides are nicely browned.

11

Place the steak in a large pot.

12

Add 2 cups of red wine (I used Malbec because it's Argentinian).

13

Add water until the steak is submerged.

14

Add the oregano, thyme, garlic and bay leaves.

15

Simmer for about 90 minutes, until meat is tender.

16

Place on a cutting board and let it sit for about 10 minutes.

17

Slice up and serve with steamed carrots and sweet potato fries. Yum!

18

Chimichurri Sauce: Chop, chop, chop all of the herbs and vegetables until very fine, especially the parsley.

19

Add the rest of the ingredients and stir to combine.

20

Let the marinade sit in the fridge for at least one hour.

21

Refrigerate after dinner. Will be good in the fridge for a couple of days.

chimichurri recipe lightly adapted from Jamie Magazine

Cooking

Easy Chicken Thighs in Peanut Sauce and Cookbook Review

chicken thighs in peanut sauce with green beans

The Ultimate One-Pan Oven Cookbook – Book Review

I recently had Julia Konovalova’s cookbook, The Ultimate One-Pan Oven, sent to me to review from Food Bloggers of Canada. I prepared one dish from the book for my review: Easy Chicken Thighs in Peanut Sauce with Green Beans. It was soooo good. I’ve tried a lot of homemade peanut sauces over the years, with most recipes being duds, but this one was tasty and full of flavour. If you’re interested in family-friendly, easy and delicious recipes, read on.

The Ultimate One-Pan Oven Cookbook was written by blogger Julia Konovalova, creator of Imagelicious. I have to admit, this is my first cookbook review. I have been reading cookbooks since I was a little girl, and somehow thought this would be a fun and easy activity. Well, of course, browsing through any cookbook is fun, but reviewing one is not as easy as I thought.

I realized as I was going through this book, that there is a lot more to a good cookbook than just the recipes. Everything about the book has to make you want to use it: the photos, the names of the recipes, the layout of the book, the style of writing, the categories of recipes and of course, the recipe instructions.

I will break my review down into the categories mentioned above.

The Photos

Every recipe in this book is complimented with an eye-popping, mouth-watering photograph. I love that the photographs are light and bright and really expose the natural look of each dish and are not over edited. The dishes look just the way they would on your kitchen table at suppertime. And that’s nice.

Recipe Names

While browsing through the cookbook, I was drooling over the food adjective-heavy names. She includes recipes such as Cocoa-Rubbed Pork Back Ribs with Chocolate BBQ Sauce, or Roasted Berries with Orange Mascarpone. The names, ingredients, accoutrements – so simple, so delicous-sounding.

Layout

I really like the layout of this book. The book starts out with a short two-page intro of how Julia got interested in cooking, as well as what she likes and doesn’t like. This helps the reader decide quite early on if they’re on the same page as the author. Julia doesn’t like stress in the kitchen. She likes healthy family-friendly recipes with minimal effort and washing up. Also, the abundance of photos really entices the reader to use the book.

Writing Style

Julia’s experience as a food blogger is evident in the personal anecdotes she includes at the beginning of every recipe. She always has a nice paragraph at the beginning of every recipe explaining what she loves about a particular ingredient in the recipe on the page. Her comments and dialogue are very insightful and help us get to know her and learn what is important to her: her family, fresh produce and a no-muss no-fuss style of cooking. This book is so perfect for people that love home cooked meals, but don’t want to spend hours in the kitchen preparing and cooking dinner.

Categories

I love the categories in this book. Because this book is primarily savoury dishes, with ten sweet dishes at the end, all baked in a pan in the oven, it could be challenging to divide the recipes into interesting and different groups. But her categories are brilliant: Oven-Made Breakfasts, Complete One-Pan Oven Meals; Hands-Off Main Dishes, Simple Soups, Salads and Sandwiches, Easy Sides, One Pan, Many Nibbles and ending with Delicious and Unique Desserts.

Recipe Instructions

The instructions are clear and precise. I like how she uses metric and imperial measurements, as we Canadians still use a mix of both.

She also has many helpful Notes at the bottom of the recipe.


chicken thighs in peanut sauce with green beans

If you’re looking for a cookbook as a gift this Christmas, definitely have a browse through this book. It is full of imagination, creativity and some very delicious meals anyone would be happy to prepare for suppertime.

Here’s a link to her cookbook on Amazon.ca The Ultimate One-Pan Oven Cookbook by Julia Konovalova.

Easy Chicken Thighs in Peanut Sauce with Green Beans

Serves: 4
Cooking Time: 30

Ingredients

  • 2 tbsp (30 ml) olive oil, divided
  • 1/4 cup 45g smooth peanut butter
  • 2 tbsp (30 ml) lemon juice
  • 4 tbsp (60 ml) orange juice
  • 2 tbsp (30 ml) Sriracha (I used Sambal Olek)
  • 8 skinless, boneless chicken thighs
  • 3/4 lb (340 g) green beans
  • salt and pepper to taste

Instructions

1

Preheat the oven to 425 degrees F (218 C). While the oven is preheating, mix 1 tbsp (15 ml) of the olive oil with the peanut butter, lemon juice, orange juice, soy sauce, and Sriracha in a bowl. (Julia mentions that she likes to use a small glass jug for this. She recommends heating the sauce ingredients, as it's much easier to mix when the peanut butter is warm).

2

Place the chicken thighs in the middle of a 11 X 17 inch or 28 X 43 cm nonstick baking pan. You need room for all the ingredients to spread out. Make sure that the chicken thighs are fully flattened. Pour half the sauce over the thighs, then flip and pour the rest of the sauce, making sure that it fully covers the chicken. Alternately, you could mix the thighs in a bowl with the sauce. However, that would add one extra dish to your washing up.

3

Spread the green beans around the chicken thighs in one layer. Pour the remaining 1 tbsp (30 ml) of olive oil over the green beans, season with salt and pepper to taste and lightly mix with your hands or tongs to cover them with oil and seasoning.

4

Roast for 30 minutes, or until the chicken thighs are cooked to 165 degrees F (74 C) and the sauce is thickened.

5

Serve with rice, if desired, or double the amount of green beans and cook on a separate pan.

Cooking

Awesome Turkey Meatballs with Roasted Vegetables

turkey meatballs with roasted vegetables

I love turkey dinners. But it seems that major holidays are the only times that I think of serving it for dinner. And yet there are plenty of ways to cook turkey without having to roast a whole bird. This recipe for my Awesome Turkey Meatballs with Roasted Vegetables is easy and nutritious. Plus, as it bakes in the oven you can sit back and relax and let the oven do all the work for you!

I really like using ground turkey (ground chicken would also work if you can’t find turkey).  Turkey is very versatile and has a delicate flavour so it will compliment many other flavours.

turkey meatballs with roasted vegetables

This turkey meatball dinner is an easy healthy one-pan dish that you will want to make again and again.

All of the ingredients are cooked all together in one pan: potatoes, autumn vegetables and turkey meatballs. I love dishes like this. While everything is baking in the oven, I can set the table and get drinks ready or sit for 30 minutes and read another chapter in one of my on-going reads.

turkey meatballs with roasted vegetables

The vegetables caramelize slightly in the pan while the turkey meatballs bake to a nice golden brown. Halfway through baking, pour over a tin of cherry tomatoes to create a scrumptious thick tomato sauce.

turkey meatballs with roasted vegetables

This dish is also tasty without the tinned cherry tomatoes…just turkey, veg and potatoes!

With or without the tinned tomatoes, this one-pan dish comes together in a flash and is just SOOOO yummy!

turkey meatballs with roasted vegetables

Serve this dish up with a glass of your favourite wine, some baguette and jazz music in the background.

Enjoy!

Totally Awesome Turkey Meatballs with Roasted Vegetables

Serves: 4
Cooking Time: 45 minutes

Ingredients

  • 450 g ground turkey
  • 75 g dry breadcrumbs
  • 2 eggs
  • 1 tsp oregano
  • 1/2 tsp thyme
  • 1/2 tsp salt
  • 1 eggplant, cubed
  • 3 medium zucchini, sliced thickly on diagonal
  • 3 plum tomatoes, cubed
  • 1 onion, chopped roughly
  • 2 garlic cloves, sliced
  • 4 medium potatoes, cut into 1" cubes
  • olive oil
  • 1 14 ounce can of cherry tomatoes (optional, but we preferred this dish with the extra tomatoes)

Instructions

1

Oil two 9 X 13 inch trays.

2

Mix together meatball ingredients. Form into 12-16 meatballs.

3

Place meatballs on trays.

4

Place prepared vegetables around meatballs.

5

Drizzle everything with olive oil (about 2 Tbsp)

6

Season with salt and pepper.

7

Bake at 375 degrees F for 25 minutes. If you want, pour one 14 ounce can of cherry tomatoes over all of the vegetables and meatballs.

8

Continue to cook for another 20 minutes. Meatballs and vegetables will be golden brown.

Cooking

Quick and Spicy Chicken Wings Recipe

spicy chicken wings

Chicken Wings are one of the easiest and quickest meals anyone can make. You can buy chicken wings all year round from your local supermarket, which is great. Also, they’re inexpensive and quick to prepare and cook: no chopping, marinating or deboning.  And they’re finger foods. Who doesn’t love that!

Normally I bake them slathered in barbeque sauce, but I wanted to try and get crispier chicken wings. This Quick and Spicy Chicken Wings recipe works a charm.

spicy chicken wings

My Quick and Spicy Chicken Wings are super quick to prepare. They are seasoned with a balanced combination of spices and herbs including chili powder, chipotle chili pepper, oregano and a few others. The cayenne pepper is adjustable. I used 1/2 a teaspoon, but if you are making these for wee ones, just leave it out. It’s not super hot, just a nice warm flavour, but too much heat for small ones.

spicy chicken wings

This recipe makes about 1/4 cup of spice mixture. You could also multiply the recipe by 3 or 4 and keep it in a jar and just measure out 1/4 cup every time you make wings. You could also sprinkle a bit of this spicy mixture on chicken breasts to use in wraps or fajitas.

For a fantastic finger food dinner, serve these up with some veggies, pita bread and hummous or one of your favourite dips. Then you could eat the whole dinner with your fingers! Less dishes, more time for fun!


spicy chicken wings

Enjoy!

Quick'nSpicy Chicken Wings

Serves: 3-4
Cooking Time: 45 minutes

Ingredients

  • 2 lbs of chicken wings (rinsed and patted dry)
  • 1 T chili powder
  • 2 tsp chipotle chili pepper
  • 1 tsp paprika
  • 1/2 tsp oregano
  • 1/2 tsp cumin
  • 1/2 tsp cayenne pepper
  • 1/2 tsp salt
  • 1/2 tsp pepper
  • 1 T dark brown sugar

Instructions

1

Preheat oven to 350 degrees fahrenheit.

2

Mix spices together.

3

In a large bowl, sprinkle spices over chicken wings.

4

Coat the wings with the spice mixture with your hands.

5

Place the seasoned chicken wings on a baking sheet lined with parchment paper.

6

Bake for 45 minutes, turning once after about 20 minutes.

7

Bake until a deep golden colour.

8

Serve hot or room temperature.

Notes

Chicken wings give off a bit of oil when cooking. When you're turning them over, just place them on a clean portion of the parchment paper.

Cooking

Barbecued Jamaican Jerk Pork Sandwiches

jamaican jerk pork sandwiches

Even though the summery weather is slowly fading, I’m happy that we can still barbecue for another few weeks. Jamaica Jerk Pork is perfect Autumn barbecue food because the gentle heat of the jerk spices warm you up as the evening cools down. My husband and I loved camping in the fall: the campgrounds were quiet and still, the lake water still warm from the heat of the summer and the bugs had all but disappeared.  And whenever we camped, we always made Jamaican Jerk Pork.

Homemade Jamaican Jerk Pork is so perfect for the home barbecue, or outdoors campfire. The direct heat from the barbecue or campfire gives this dish its special characteristics: smoky, spicy and seared with flavour. Jamaican Jerk Pork is made from cubes of pork seasoned with a spicy, aromatic marinade. After the pork has marinated for a minimum of a four hours (although we always did it overnight) the pork is cooked on the campfire or barbecue until the meat is seared to a deep golden brown on all sides and cooked through. It is pure heaven. We always served the jerk pork with fresh juicy local-grown tomatoes and crisp iceberg lettuce wrapped up in a warmed pita. The heat of the jerk with the coolness of the fresh vegetables is a unique combination.

ingredients for jamaican jerk pork sandwiches

Jamaican Jerk is really easy to make with white and green onion, thyme, soy sauce, oil and a few pantry spices.

herbs and spices for jamaican jerk pork sandwiches

Finely chop all of the ingredients in the food processor.

Barbecuing the pork is super easy. There are two ways that you can barbecue the pork. 1) either on skewers, or 2) in a perforated pan. I usually wrap the pita bread in tin foil and heat it gently by the fire.

jamaican jerk pork sandwiches

Place the grilled pork cubes, into pita bread or a wrap grilled pineapple, tomato and lettuce.

So perfect!

Jerk Pork

Serves: 6
Cooking Time: 12 hours + 20 minutes

Ingredients

  • For the marinade:
  • 1 onion, finely chopped
  • 1/2 cup scallion, finely chopped
  • 2 teaspoons fresh thyme leaves
  • 1 teaspoon salt
  • 2 teaspoons sugar
  • 1 teaspoon ground jamaican pimento (allspice)
  • 1/ teaspoon ground nutmeg
  • 1/2 teaspoon ground cinnamon
  • 1 hot pepper, finely ground (see Note)
  • 1 teaspoon ground black pepper
  • 3 Tbsp soy sauce
  • 1 Tbsp cooking oil
  • 1 Tbsp cidre or white vinegar
  • 3 pounds pork tenderloin
  • condiments:
  • tomatoes
  • lettuce
  • grilled pineapple
  • pita bread
  • condiments such as BBQ sauce or salsa

Instructions

1

To Make the Marinade: Place all marinade ingredients in a food processor and blitz until everything is finely chopped.

2

Cube the pork into pieces about 1". Mix pork cubes and jerk marinade together. Marinate a minimum or 4-6 hours or overnight in the refrigerator.

3

Next day, thread cubes of pork on skewers and barbecue until meat registers 145 degrees F on a cooking thermometer. Meanwhile, warm pita bread in low oven (about 300 degrees) for about 10 minutes. Or, if you are cooking outdoors, wrap the pita in tin foil and place on top of grate to warm up. Don't get them too hot or they will just toast.

4

Place jerk pork in a bowl and serve with diced tomatoes, grilled pineapple, chopped lettuce and pita bread cut in half and popped open. Alternatively, you can place ingredients on top of pita and just roll up. Serve with your choice of barbecue sauce or salsa if you like.

Notes

Tip: The peppers you choose will depend on how spicy you want the jerk marinade. The most common hot peppers available in supermarkets are: jalapeno (mild to hot), serrano (hot), habanero (very hot), bird's eye chill peppers (very very hot). And remember! when working with fresh peppers, be extra careful and never rub your eyes, nose, or mouth when working with peppers. Wash your hands with soap and water immediately after cutting the peppers up. Extra Cooking Tip: We love grilled pineapple with the Jamaican Jerk Pork. If you buy fresh pineapple in the grocery store that has the skin and top removed, slice the whole piece down the centre so you have two halves. The slice the two halves in half. This makes it easy to remove the core. After you have sliced away the core (the woody fibrous part in the centre, slice each segment into pieces about 1/2 inch thick and grill these in a perforated vegetable tray on your barbecue.

Recipe adapted slightly from Jerk, Barbecue from Jamaica by Helen Willinsky.

Cooking

Armenian Red Lentil and Apricot Soup Recipe

Armenian Red Lentil and Apricot Soup

The days are getting shorter, the nights cooler. Sweaters are coming out of their storage bins, light ones first. The heavy wool ones will come later. The rain jackets hang in the front closet. Rain boots are placed in the hallway near the door. Autumn is coming.

Cooler weather also means new menus. So, I’m filling my pantry and freezer with new ingredients for these approaching autumn days: pasta for comforting macaroni and cheese and hearty lasagna, beans for chili and soups, and dried fruit, nuts and a multitude of flours for baking – cookies, squares and pies. And I’m filling my downstairs freezer with big containers of soup stock.

vegetables for Armenian Red Lentil and Apricot Soup


This Armenian Red Lentil and Apricot Soup is a perfect seguay into our autumn menus. The earthy onions, carrots and lentils remind us of the approaching coolness, while the flavour of the sweet apricots tug at the memory of the summer weather that hasn’t completely ended.

Apricots have always been very special in Armenia, as their scientific name, Prunus Armeniaca, or Armenian prunes, shows. They have grown in Armenia for many centuries. A recent dig at an ancient village found apricot cores that were over 3,000 years old!

So, it goes without saying, that Armenians use apricots in many of their dishes.. During apricot season, women make jams, marmalades, even homemade apricot vodka. After the season has ended, apricots are places on balconies and rooftops to dry in the sun to be used whole or made into apricot leather. Armenians want their precious apricots to last until the next season.

This soup is very tasty and also very nutritious. This soup provides an excellent source of iron, protein, folate, B vitamins, Vitamins A and C as well as potassium. Not bad for one bowl of soup.

You can use store bought of homemade vegetable stock. If you want to make your own vegetable stock, you can find my recipe here.

If anyone had any doubts about vegan food – whether it’s tasty, nutritious or filling – one bowl of this soup would settle that argument. I hope you enjoy my Armenian Red Lentil and Apricot Soup.

Armenian Red Lentil and Apricot Soup

Enjoy!

Armenian Red Lentil and Apricot Soup

Serves: 4-6
Cooking Time: 40-60 minutes

Ingredients

  • 1 onion, chopped
  • 3 carrots (200 grams), peeled and chopped
  • 1 garlic cloves, peeled, crushed and chopped
  • 1/2 cup dried apricots, chopped
  • 1 tsp cumin powder
  • 1 cup tomato puree
  • 2/3 cup red lentils, washed
  • 1 litre vegetable broth
  • 1/4 tsp dried thyme
  • salt and pepper, to taste
  • 3 tbsp lemon juice
  • a handful of parsley, chopped

Instructions

1

Saute the onions and carrots. When almost soft, add the garlic, and cook until fragrant, about 30 seconds.

2

Add apricots and cumin powder and cook until aromatic.

3

Add tomato puree.

4

Then add the lentils, vegetable broth and thyme.

5

Bring the soup up to a boil, and then simmer for about 20 minutes.

6

Take the soup off the heat. Add the lemon juice, salt and pepper.

7

Either blitz half of the soup in the blender, or use a hand held mixer, and blitz a bit, but make sure it's not entirely pureed.

8

Serve in bowls with parsley sprinkled on top.